flowchart TD
    A["1. You type a prompt"] --> B["2. Agent reads codebase"]
    B --> C["3. Agent calls an LLM"]
    C --> D["4. LLM picks tools"]
    D --> E["5. Agent executes tools"]
    E -->|"iterate"| C
AI Coding Agents — Codex
From Chat to Agent — 2026 DCI Summer Workshop, Day 1 Session 3
Today’s session
This morning you talked to a 0.8-billion-parameter LLM in a chat window. This afternoon you will delegate work to an AI agent that reads files, runs commands, and iterates on its own — guided by the same kind of model, but wrapped in a very different machine.
The agent we use is OpenAI Codex, in its Desktop form (the macOS / Windows app). By the end of this session you will have Codex installed, authenticated, pointed at a project folder, and you will have asked it to do one real task on your laptop. We will use it heavily for the rest of the workshop.
Note
Teaching goal: not “learn Codex” — Codex changes weekly. Learn the pattern: how any AI coding agent works, so that switching to Claude Code, Opencode, Aider, or whatever ships in six months is a matter of reading their docs, not relearning the concepts.
Before we open Codex — your computer’s folder system
Codex Desktop opens a folder and works inside it. The agent reads, writes, and runs commands relative to that folder. Before we can point Codex at anything, you need a clear mental map of where files live on your computer.
Most students arrive at this workshop able to use applications but unable to answer “where exactly is the file I just downloaded?” Today we fix that.
The home folder
Every user account on a computer has a home folder. Everything you personally own lives somewhere inside it.
| Your OS | Your home folder is | Shorthand |
|---|---|---|
| macOS | /Users/<your-name>/ |
~ |
| Windows | C:\Users\<your-name>\ |
%USERPROFILE% |
| Linux / WSL | /home/<your-name>/ |
~ |
The ~ symbol (read “tilde”) means “my home folder.” When we write ~/genai-workshop/ we mean the same folder on every Mac and Linux laptop, regardless of whose login it is.
The five folders that matter
Inside your home folder, the operating system gave you a handful of standard subfolders. The ones you will actually use this week:
| Folder | macOS path | Windows path | What’s in it |
|---|---|---|---|
| Documents | ~/Documents |
C:\Users\<you>\Documents |
Personal documents. Often (silently) cloud-synced. |
| Downloads | ~/Downloads |
C:\Users\<you>\Downloads |
Where browsers drop files. Treat as temporary. |
| Desktop | ~/Desktop |
C:\Users\<you>\Desktop |
The visible desktop is a folder. Files dragged onto the desktop are files in this folder. |
| Applications / Program Files | /Applications |
C:\Program Files\ |
Installed apps. Not under your home folder. |
| Library / AppData | ~/Library (hidden) |
%APPDATA% (hidden) |
App settings, caches, secrets. Usually hidden by default. |
Open a Finder window (macOS) or File Explorer window (Windows) now and click through each one. Watch the path in the address bar change as you move.
The cloud-storage trap
Your Documents and Desktop folders may not actually be on your laptop. If you (or your IT department) turned on any of these, they are silently synced to a cloud service:
- macOS: System Settings → Apple ID → iCloud → “Desktop & Documents Folders.” When this is on,
~/Documentsis actually~/Library/Mobile Documents/com~apple~CloudDocs/Documents/and every file inside lives in iCloud. - Windows: OneDrive’s default install relocates
Documents,Desktop, andPicturesintoC:\Users\<you>\OneDrive\. - Third-party: Dropbox, Google Drive, Box each create a folder inside your home that looks local but is a sync point.
This matters for two reasons:
- You can lose work. A cloud-synced folder can “dehydrate” files — replace them with stubs that only re-download on access. Offline, the file is not there. On sync conflict, you may get
foo (1).txt,foo (Conflicted Copy 2).txt, and so on. - Tomorrow’s Git lesson breaks badly inside cloud-synced folders. Git’s internal
.git/folder contains thousands of tiny objects that cloud services try to upload one by one — slow, noisy, and prone to corrupting the repository. Keep this warning in mind when you start using Git tomorrow.
Important
For everything this week, work inside a folder that lives directly in your home folder — not under Documents or Desktop.
Everyone create the same folder right now:
- macOS: open Finder → menu bar Go → Home (⇧⌘H) → File → New Folder → name it
genai-workshop. - Windows: open File Explorer → click your username under “This PC” (or press ⊞ Win + R, type
%USERPROFILE%, press Enter) → right-click → New → Folder → name itgenai-workshop.
The full path is ~/genai-workshop/ (macOS) or C:\Users\<you>\genai-workshop\ (Windows). Every Codex project this week will open a subfolder inside it.
From chat to agent
This morning you sent a prompt and received a reply. That is conversation.
An AI agent uses the same underlying LLM, but adds:
- Tools — file read/write, shell execution, web search, structured database calls, image generation.
- A loop — plan → execute → observe → re-plan. The agent decides what to do next based on what just happened, without you typing in between.
- Persistent context — an instruction file (
AGENTS.md) that loads automatically, plus per-session memory.
The shift in your role: conversation → collaboration → delegation.
Model + Harness + Surfaces
The simplest mental model for any AI coding agent. It comes from Gabriel Chua (OpenAI DevEx, APAC) and was summarized and popularized by Simon Willison in “How I think about Codex” (February 22, 2026):
| Layer | What it is | Today’s example |
|---|---|---|
| Model | The LLM doing the reasoning | gpt-5.5 (Codex’s default) |
| Harness | The scaffolding around the model — sandboxing, tools, approval flow, memory, agent loop | Codex’s Rust core |
| Surface | The user interface | Desktop app (today), CLI, IDE extension, or Web (chatgpt.com/codex) |
Codex models are trained in the presence of the harness — agent behavior is not bolted on top, it is learned. Two consequences:
- The same model behaves differently in a different harness.
- When something fails, the bug might be in the model, the harness, or the surface — and the diagnostic question is which.
We use the Desktop surface today because it is the most approachable for first-time users: a real graphical app, with the file tree, chat, and approval prompts visible in one window. Power users often graduate to the CLI later; the underlying agent is identical.
The three major AI coding agents
| Codex | Claude Code | Opencode | |
|---|---|---|---|
| Made by | OpenAI | Anthropic | Anomaly (open-source) |
| Open source | Yes (Apache 2.0) | No | Yes (MIT) |
| Default model | gpt-5.5 |
Claude Sonnet / Opus | Provider-agnostic |
| Instruction file | AGENTS.md |
CLAUDE.md |
AGENTS.md |
| Config | ~/.codex/config.toml |
~/.claude/settings.json |
~/.config/opencode/opencode.json |
| MCP support | Yes | Yes | Yes |
| Skills system | Yes | Yes | Yes |
| Desktop app | Yes | Yes (desktop app, CLI, IDE extensions) | No (CLI only) |
Tip
Master one, master them all. The fundamental pattern — agent loop + instruction file + tools + MCP + sandbox — is the same across all three. The skills you learn with Codex Desktop today transfer directly to Claude Code, Opencode, Aider, Gemini CLI, Goose, Cline, Qwen Code, Crush, Amp, and whatever ships next month.
We use Codex today because it is open-source, has the most permissive plan tiers, supports MCP and Skills cleanly, ships a real desktop app, and the docs are public at https://developers.openai.com/codex/.
Step 1 — Launch Codex Desktop
If you completed the pre-workshop setup email, Codex Desktop should already be installed.
- macOS: look in
/Applications/for “Codex,” or press ⌘Space and type “Codex.” - Windows: open the Start menu and search for “Codex.”
If it is not installed:
TipmacOS — preferred
brew install --cask codexInstalls the Codex Desktop app (and the CLI) in one command.
TipWindows
Download the installer from https://developers.openai.com/codex/ → Download → Windows. Double-click to install.
TipLinux
There is no native Linux Desktop build yet. Use the CLI (npm install -g @openai/codex) or run Codex Desktop inside a macOS or Windows VM if you must have the GUI.
Launch the app. You will see the sign-in screen.
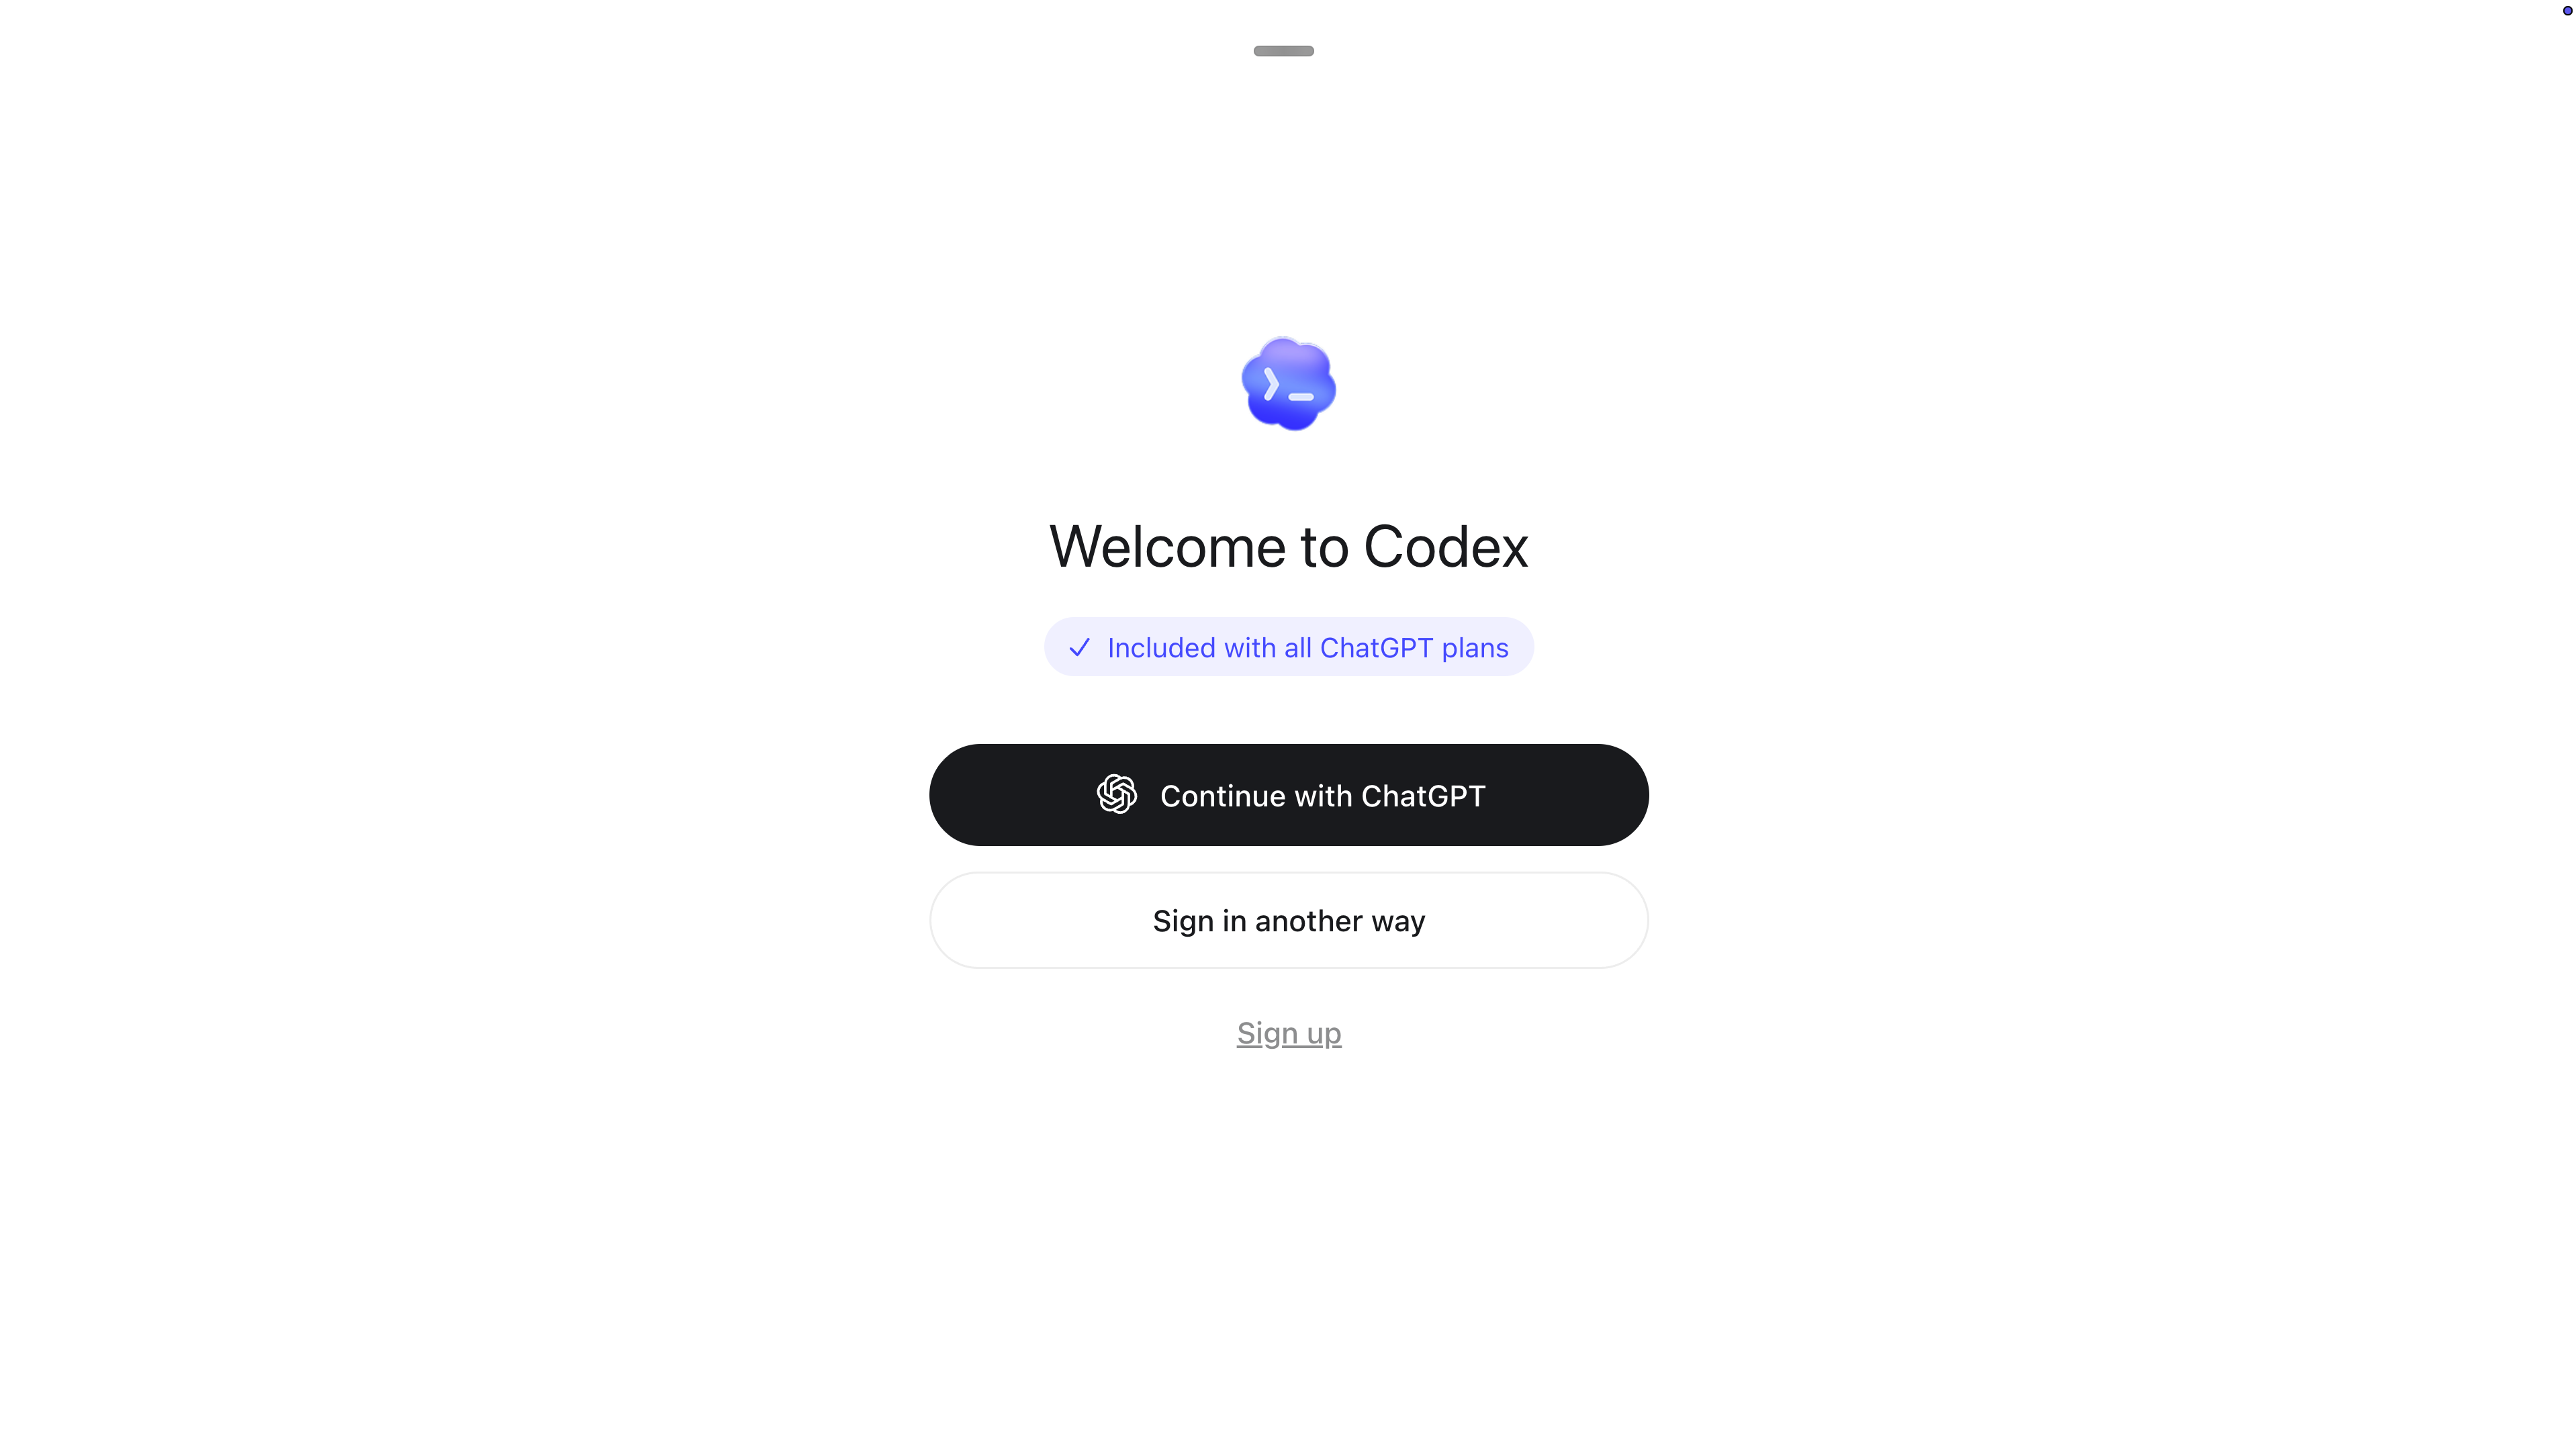
Step 2 — Authenticate
The sign-in screen gives you two paths:
- Continue with ChatGPT (recommended, the black button) — included with ChatGPT Plus, Pro, Business, Edu, Enterprise. Gives access to
gpt-5.5, the default model. Opens your default browser for OAuth. - Sign in another way (the white button) — proceeds to an OpenAI API key entry. Billed per token instead of covered by your ChatGPT plan.
Click Continue with ChatGPT. Your default browser opens.
ImportantFor Harvard-affiliated participants
- When prompted for your email, enter the Harvard email that received the workshop invitation from Jose Neta. That invitation is what grants you access to Harvard’s ChatGPT Edu organization — without it, the next step will not work.
- The next screen asks “How do you want to log in?”. At the top you should see
harvard-university-chatgptlisted as a saved SSO connection. Click that — not Google, not Microsoft, not Apple, not password.
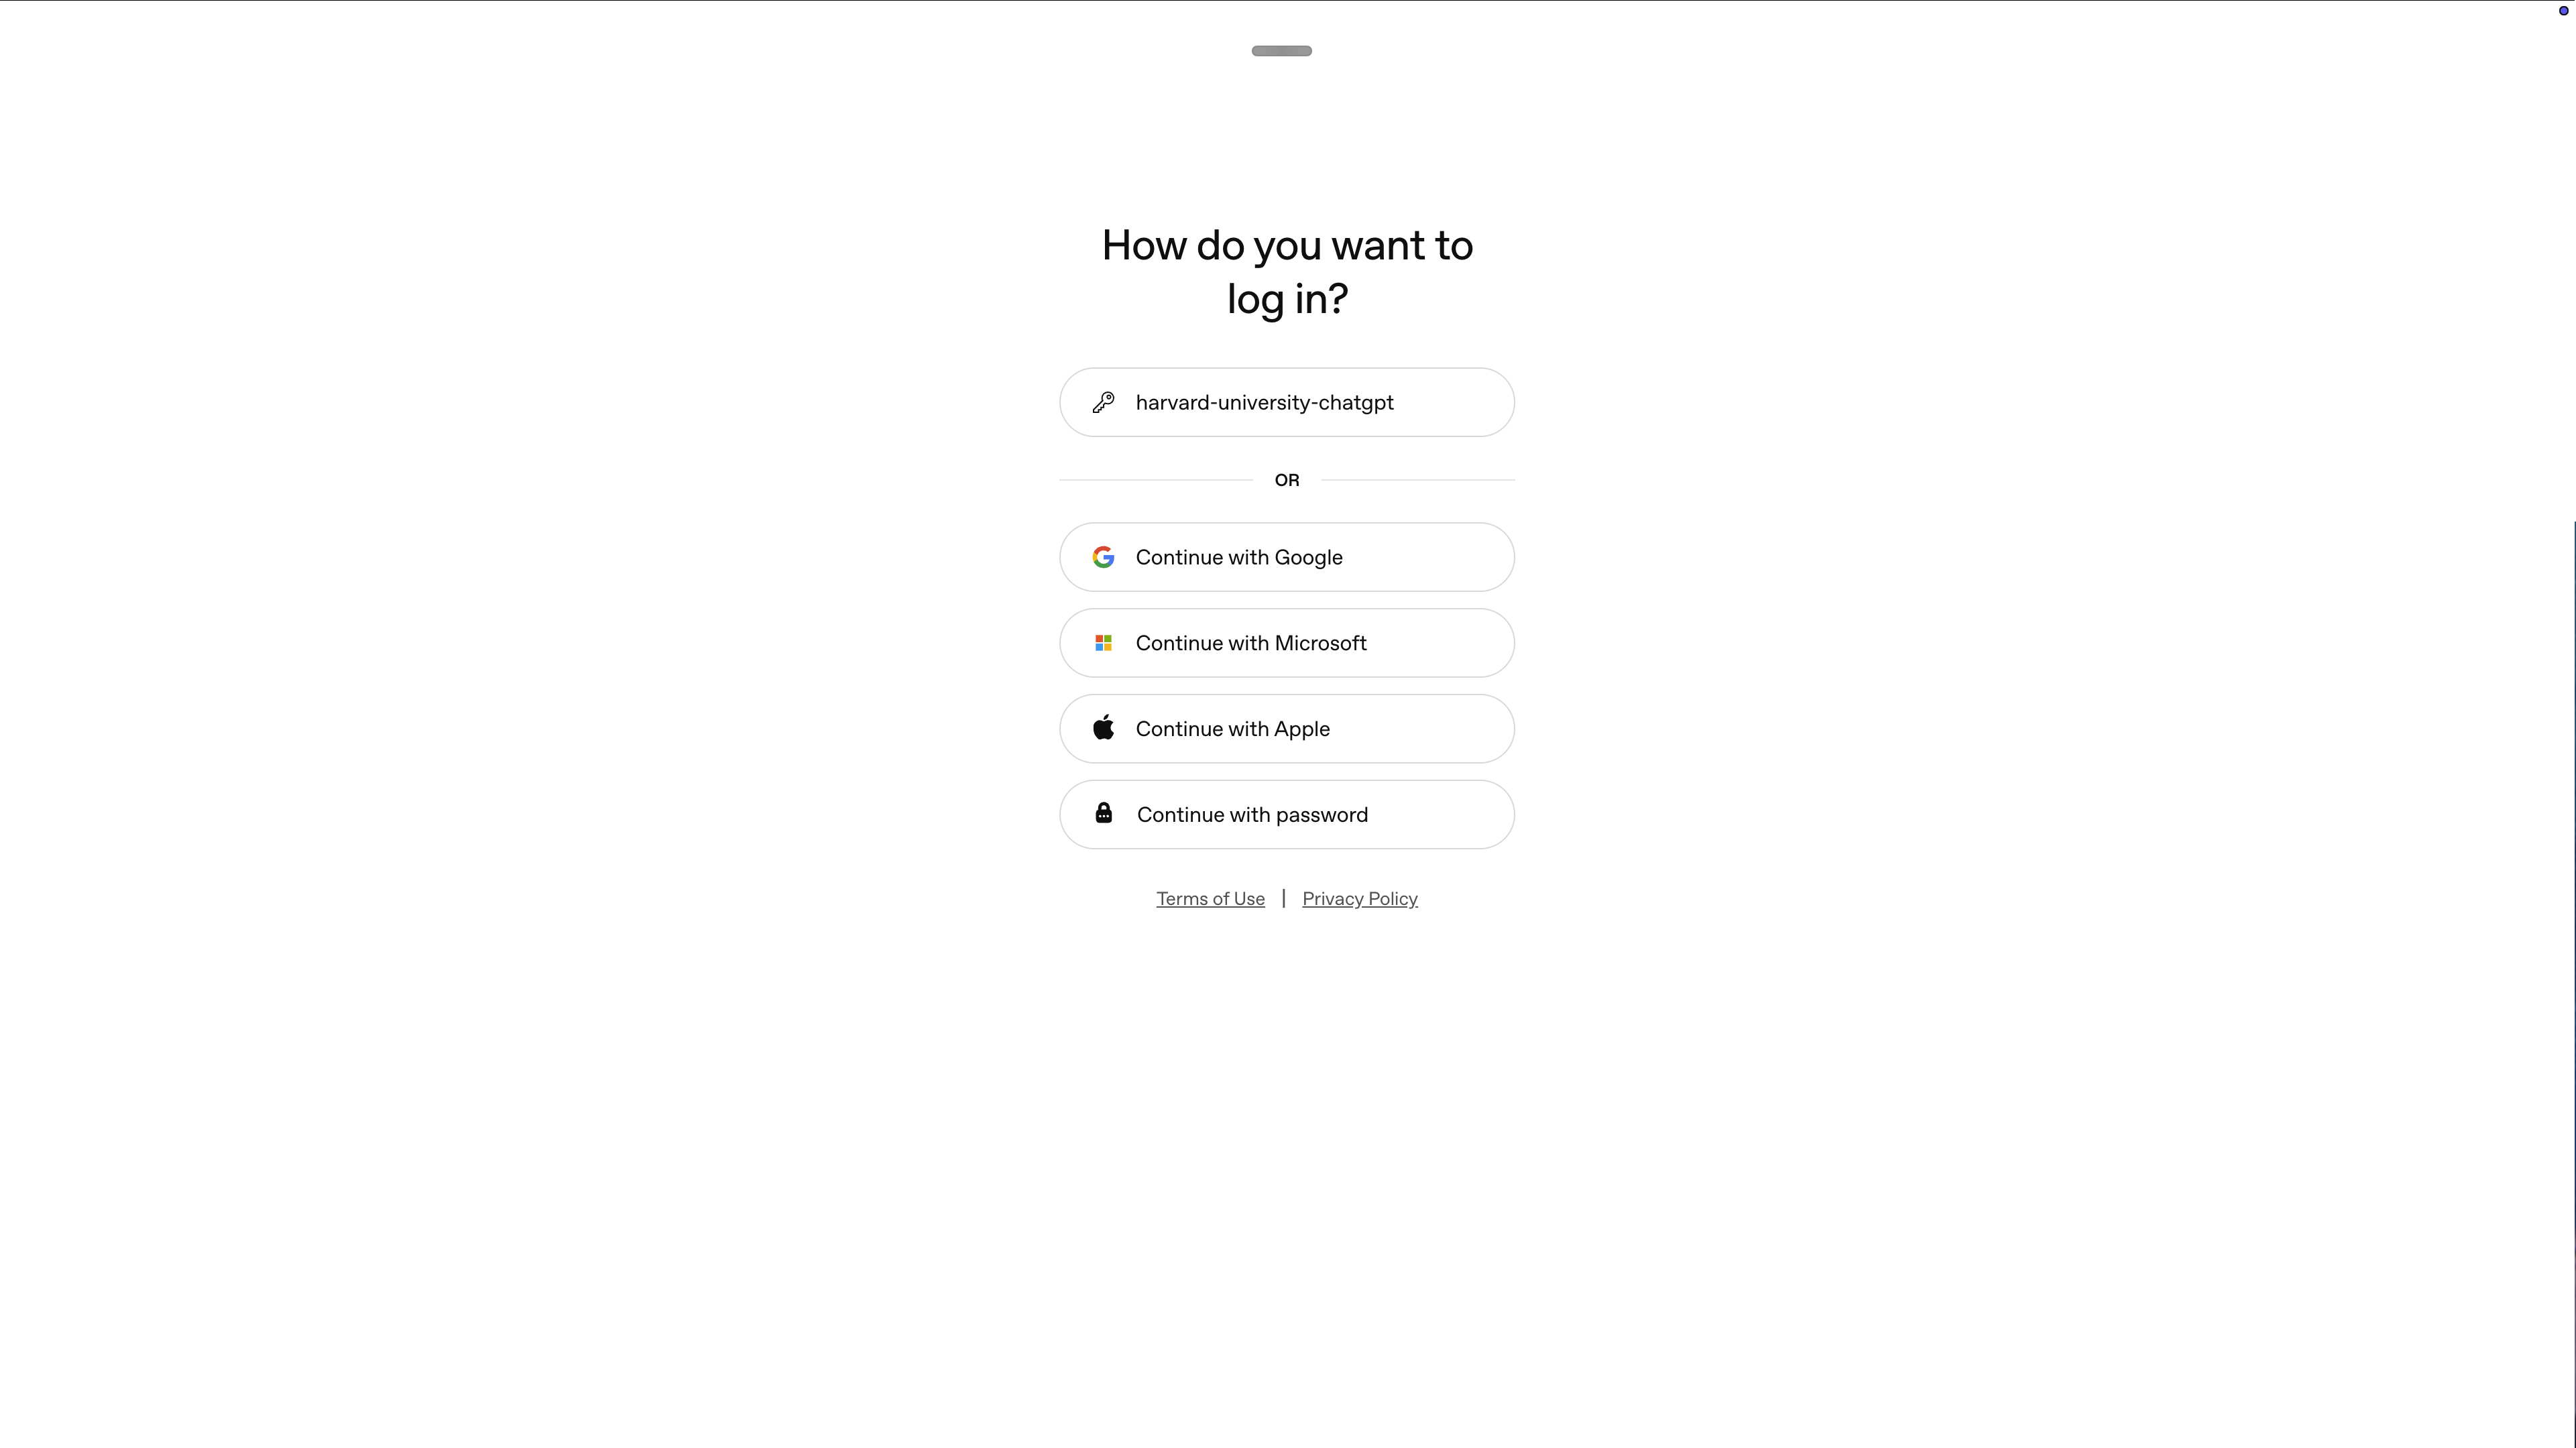
harvard-university-chatgpt at the top — that is the Harvard SSO connection. The other options (Google / Microsoft / Apple / password) will not give you access to ChatGPT Edu.- Complete the Harvard SSO flow in your usual way (HarvardKey, Duo if required). The browser will then hand control back to the Codex app.
If you do not see harvard-university-chatgpt on this screen, you likely entered an email that is not on Jose’s invitation list — check the invitation email and try again, or raise your hand and a TA will help.
TipFor non-Harvard participants
Skip “Continue with ChatGPT” and click Sign in another way on the previous Codex screen instead. A workshop API key has been provided in your registration packet — paste it when prompted.
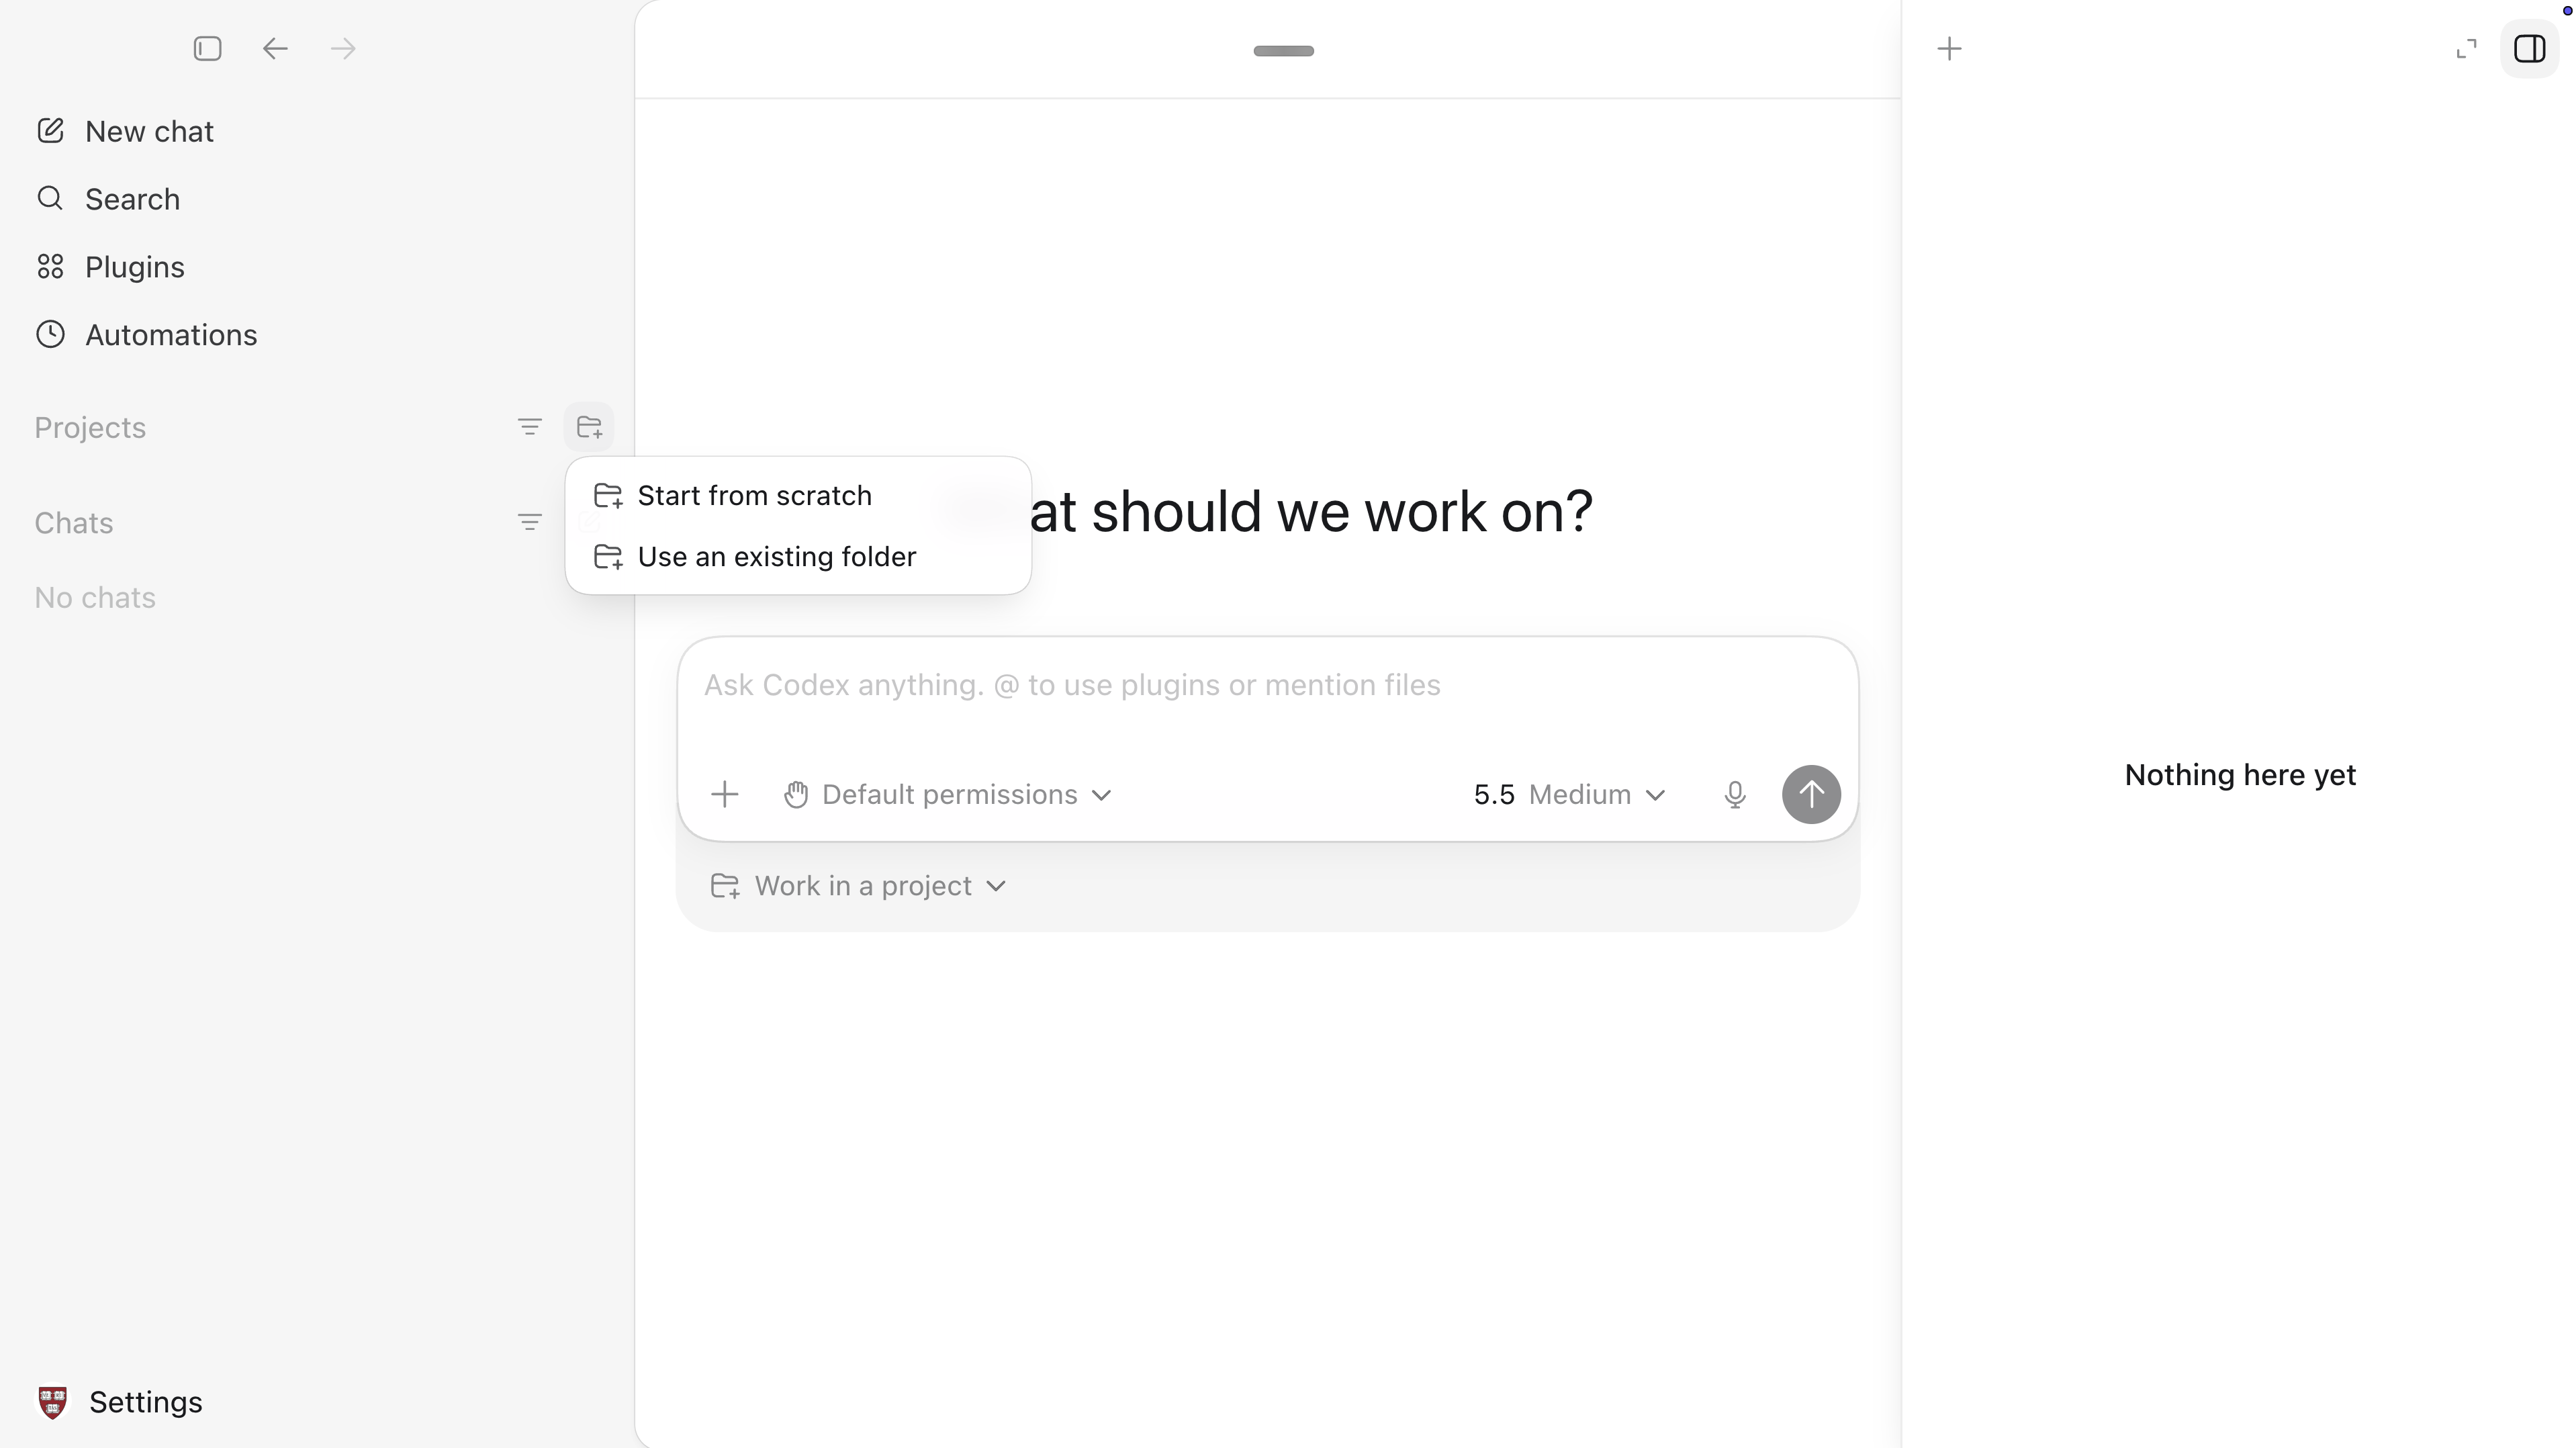
After successful authentication, the browser hands control back to the Codex app. You should now see the post-auth landing screen — Codex needs to know which folder to work in.
Step 3 — Open a project folder
Codex Desktop organises work into Projects. A project is just a folder on your disk that Codex is pointed at. Everything the agent does in that thread — reads, writes, command execution — happens relative to that folder.
Create today’s project folder first
Inside ~/genai-workshop/ (which you made in the folder-system section above), create a new subfolder named session-03:
- macOS: Finder →
~/genai-workshop/→ right-click → New Folder → name itsession-03. - Windows: File Explorer →
%USERPROFILE%\genai-workshop\→ right-click → New → Folder →session-03.
Point Codex at the folder
Back in Codex Desktop, you have two equivalent ways to open the folder as a project:
- In the left sidebar, find the Projects section. Click the “+” (new project) icon at the right end of the “Projects” heading — a small dropdown appears.
- Or in the prompt area, click the Work in a project button below the prompt box — same dropdown.
The dropdown offers:
| Option | When to use |
|---|---|
| Start from scratch | Let Codex create a brand-new project folder for you. Skip for now — we already made session-03/. |
| Use an existing folder | Point Codex at a folder you already have. This is what we want. A native file picker opens; navigate to ~/genai-workshop/session-03/ and click Open. |
After you pick the folder, Codex opens it as a project. You will see:
- The folder name (
session-03) added to the Projects section of the left sidebar — and now selected as the active project. - The chat area in the centre, empty until you send a prompt.
- The Review pane on the right (“Nothing here yet” until the agent has work to show).
Note
Codex Desktop has no separate file-tree panel. Unlike VS Code or Finder, the project’s files are not shown as a clickable tree in the window. Files live on disk; the agent (and the Review pane, once it has output) is how you interact with them. If you want to browse files visually, open the folder in Finder side-by-side with Codex.
Step 4 walks through every region of the window in detail.
Step 4 — The layout of a Codex Desktop thread
Spend two minutes orienting yourself to the interface before sending a single prompt. The screenshot below shows a Codex Desktop window with an active thread — a project open (digital-china-wiki), one task in progress (“Inspect folder structure”), a terminal pane open at the bottom, and the right-side Review pane showing the file changes the agent just proposed.
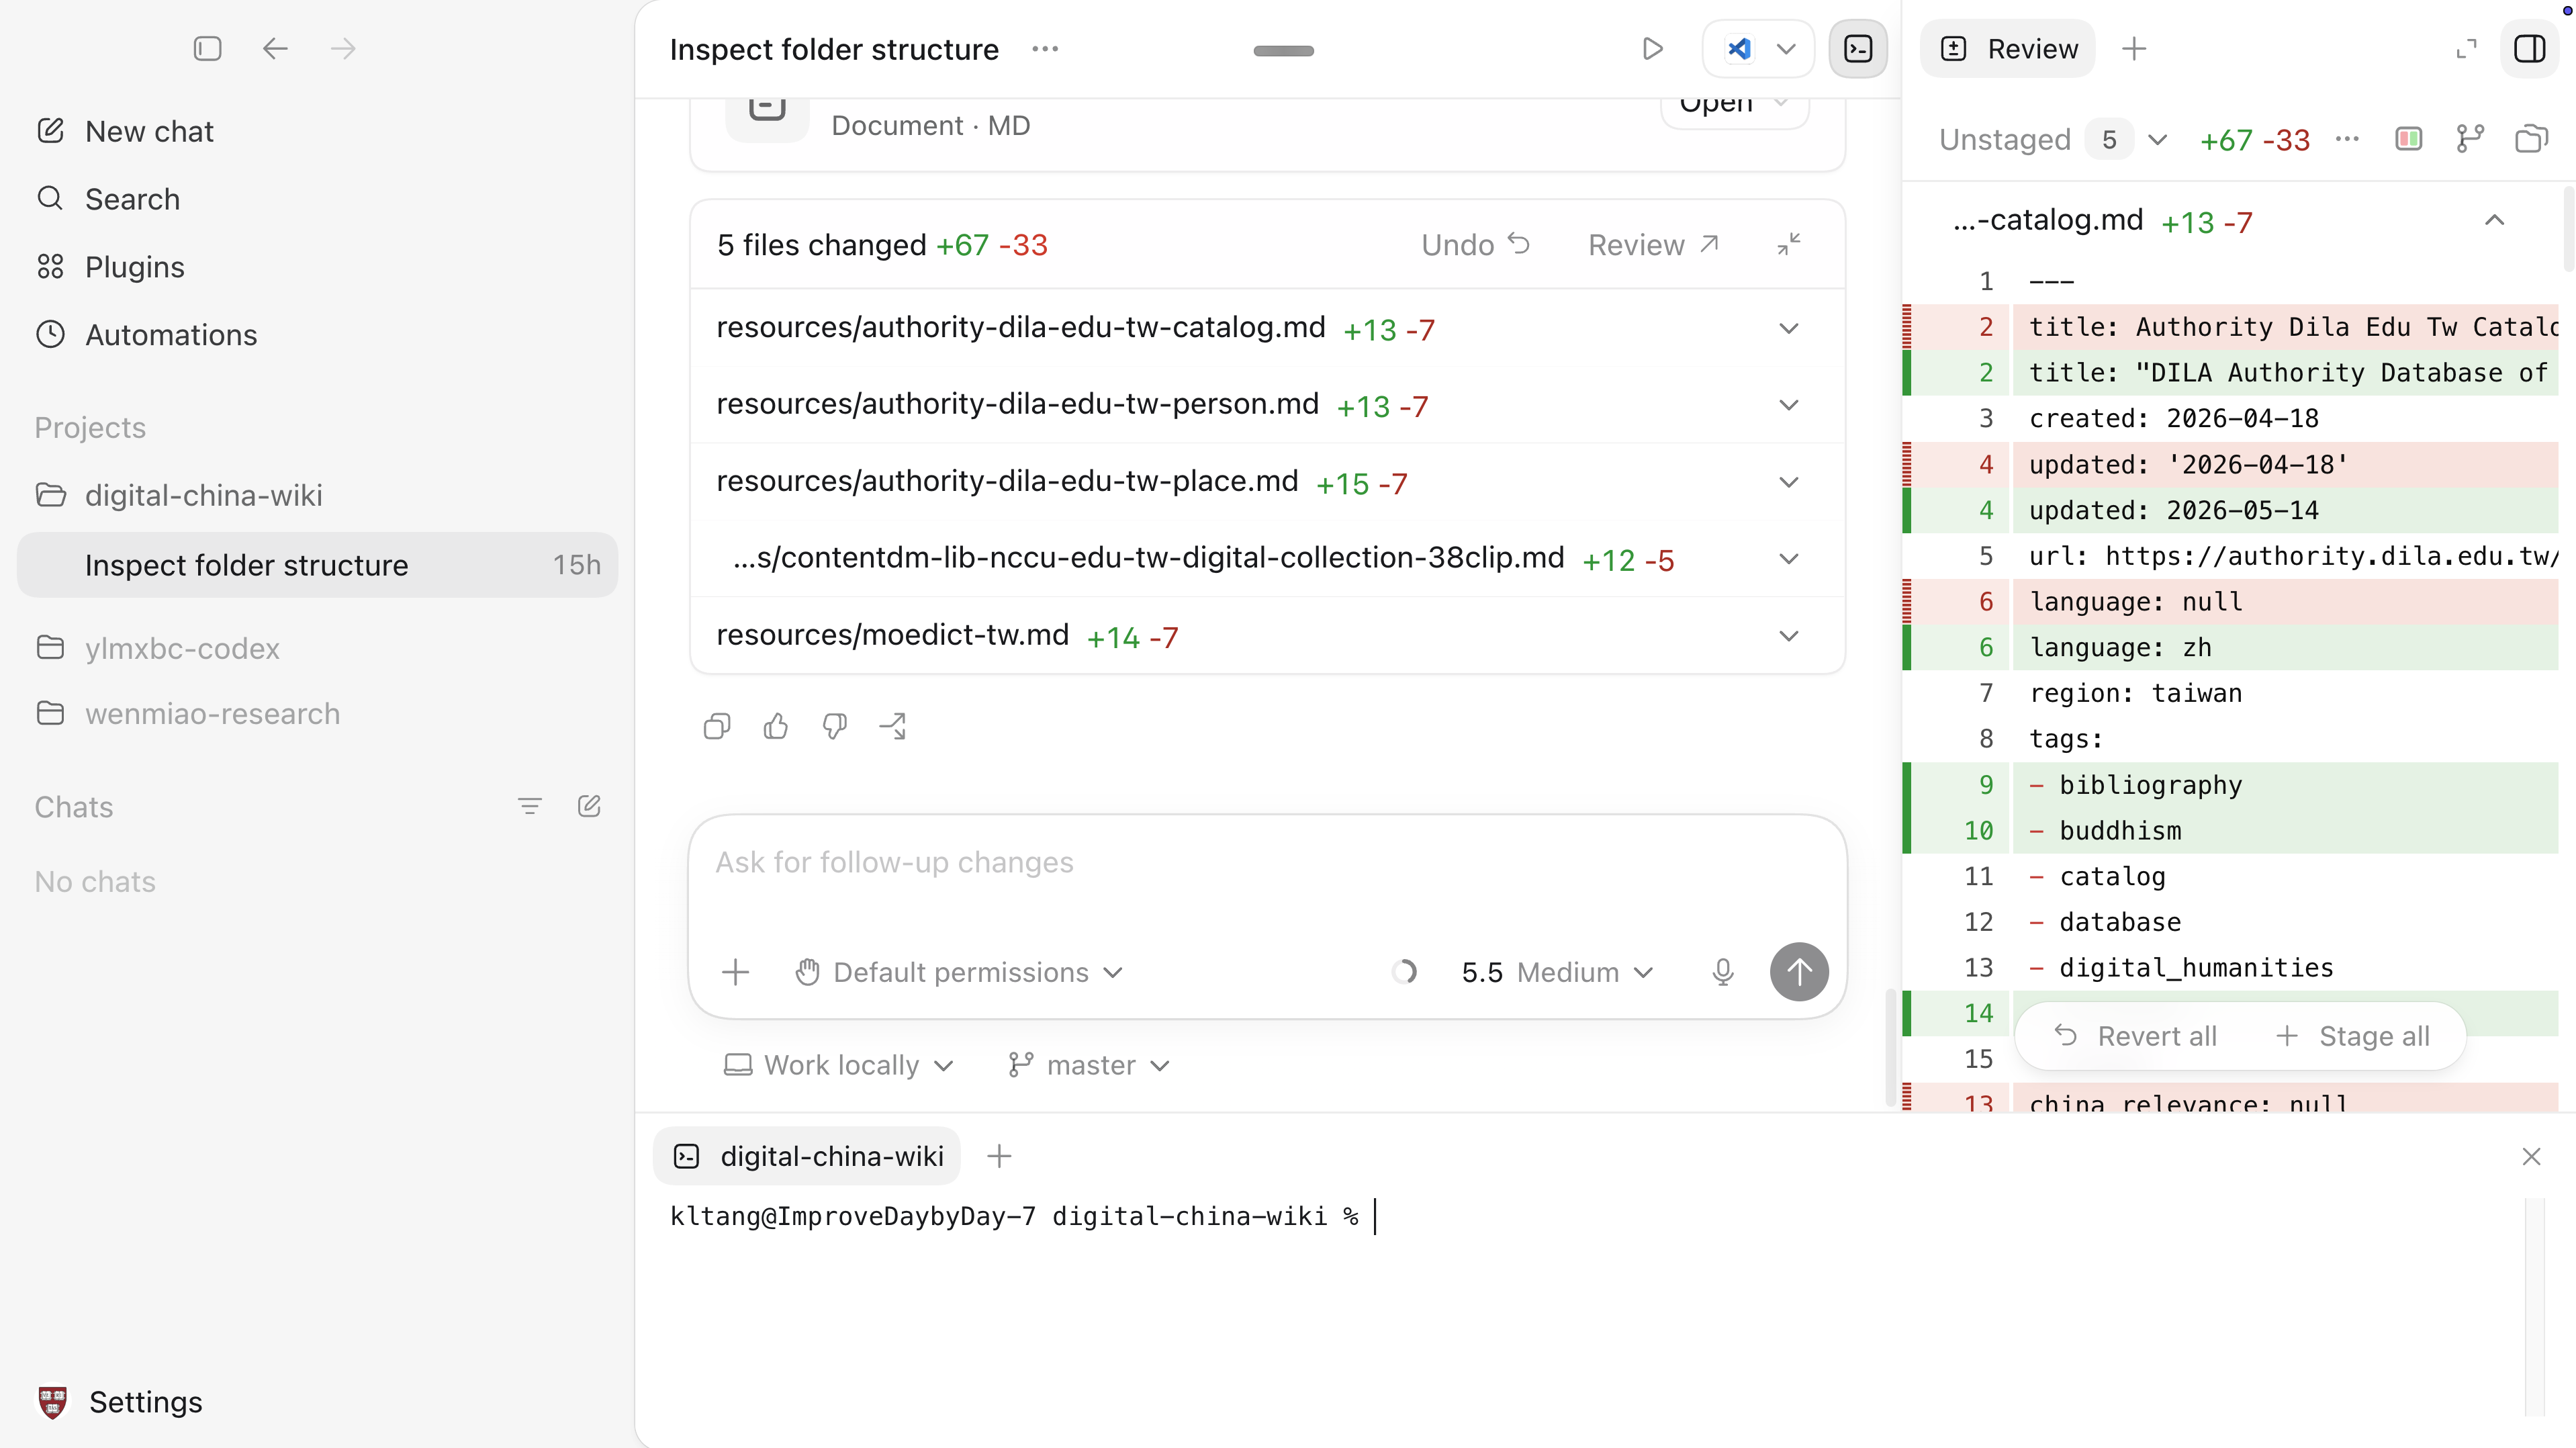
master branch indicator, and the colored diffs in the screenshot are git-aware features; today you do not have git installed yet, so those will look different on your screen.The seven regions you need to recognize:
| # | Region | Where it is | What it does |
|---|---|---|---|
| 1 | Left sidebar | Far left column | Navigation. New chat, Search, Plugins, Automations, your Projects list, your Chats list, Settings at the bottom. The currently open project is highlighted (here: digital-china-wiki). |
| 2 | Center chat pane | Middle of the window | The running conversation. Each turn shows your prompt, the agent’s reply, any tool calls, any file changes. |
| 3 | Prompt box | Bottom of the center pane | Where you type. Shift-Enter for a new line; Enter to send. |
| 4 | Permission mode selector ✋ | Bottom-left of the prompt box | Default permissions / Auto-review / Full access. Step 5 covers it. |
| 5 | Model + reasoning selector | Bottom-right of the prompt box | e.g. 5.5 Medium — picks the underlying model and how hard it thinks. Independent of permissions. |
| 6 | Right pane — Review | Far right column (toggle at top-right) | The agent’s pending file changes and previews. With git: line-by-line diffs you can Stage / Revert. Without git: just a list of files the agent touched. |
| 7 | Terminal pane | Bottom strip (hidden by default) | A real shell, embedded in the thread. Toggle with ⌘J (macOS) or the terminal icon at the top-right of the window. Each thread has its own terminal — switching threads switches shells. |
WarningWhat you will see today vs what the screenshot shows
The screenshot above was taken in a project with git installed and the folder under version control. You do not have git installed yet — we install it as homework tonight, after Session 4. So on your screen today:
- The
masterbranch indicator below the prompt box (and theWork locallybutton next to it) appear only in git repositories. You will not see them. - The Review pane (region 6) will be there, but the colored line-by-line diff view (red for deletions, green for additions) requires git. Without git the Review pane shows files the agent created or modified, but no diffs.
- The +67 / -33 numbers on the file-change summary in the chat area come from git counting added and removed lines. Without git you will see a simpler “5 files changed” without the numbers.
- The Stage all / Revert all buttons in the Review pane are git-only.
Everything else — sidebar, chat area, prompt box, permission selector, model selector, terminal — works exactly the same with or without git. Most of the workshop today will look like this screenshot minus the git annotations.
Send your first message in the prompt box:
Hello! What is the current working directory?The agent should reply with the path of the folder you opened (~/genai-workshop/session-03/ or its absolute form). Congratulations — you are now talking to an AI agent.
Step 5 — The three permission modes
Codex Desktop’s safety story is permission modes. The current mode is shown at the bottom-left of the prompt box (the small label that reads Default permissions with a hand icon ✋). Click it to open the dropdown shown here.
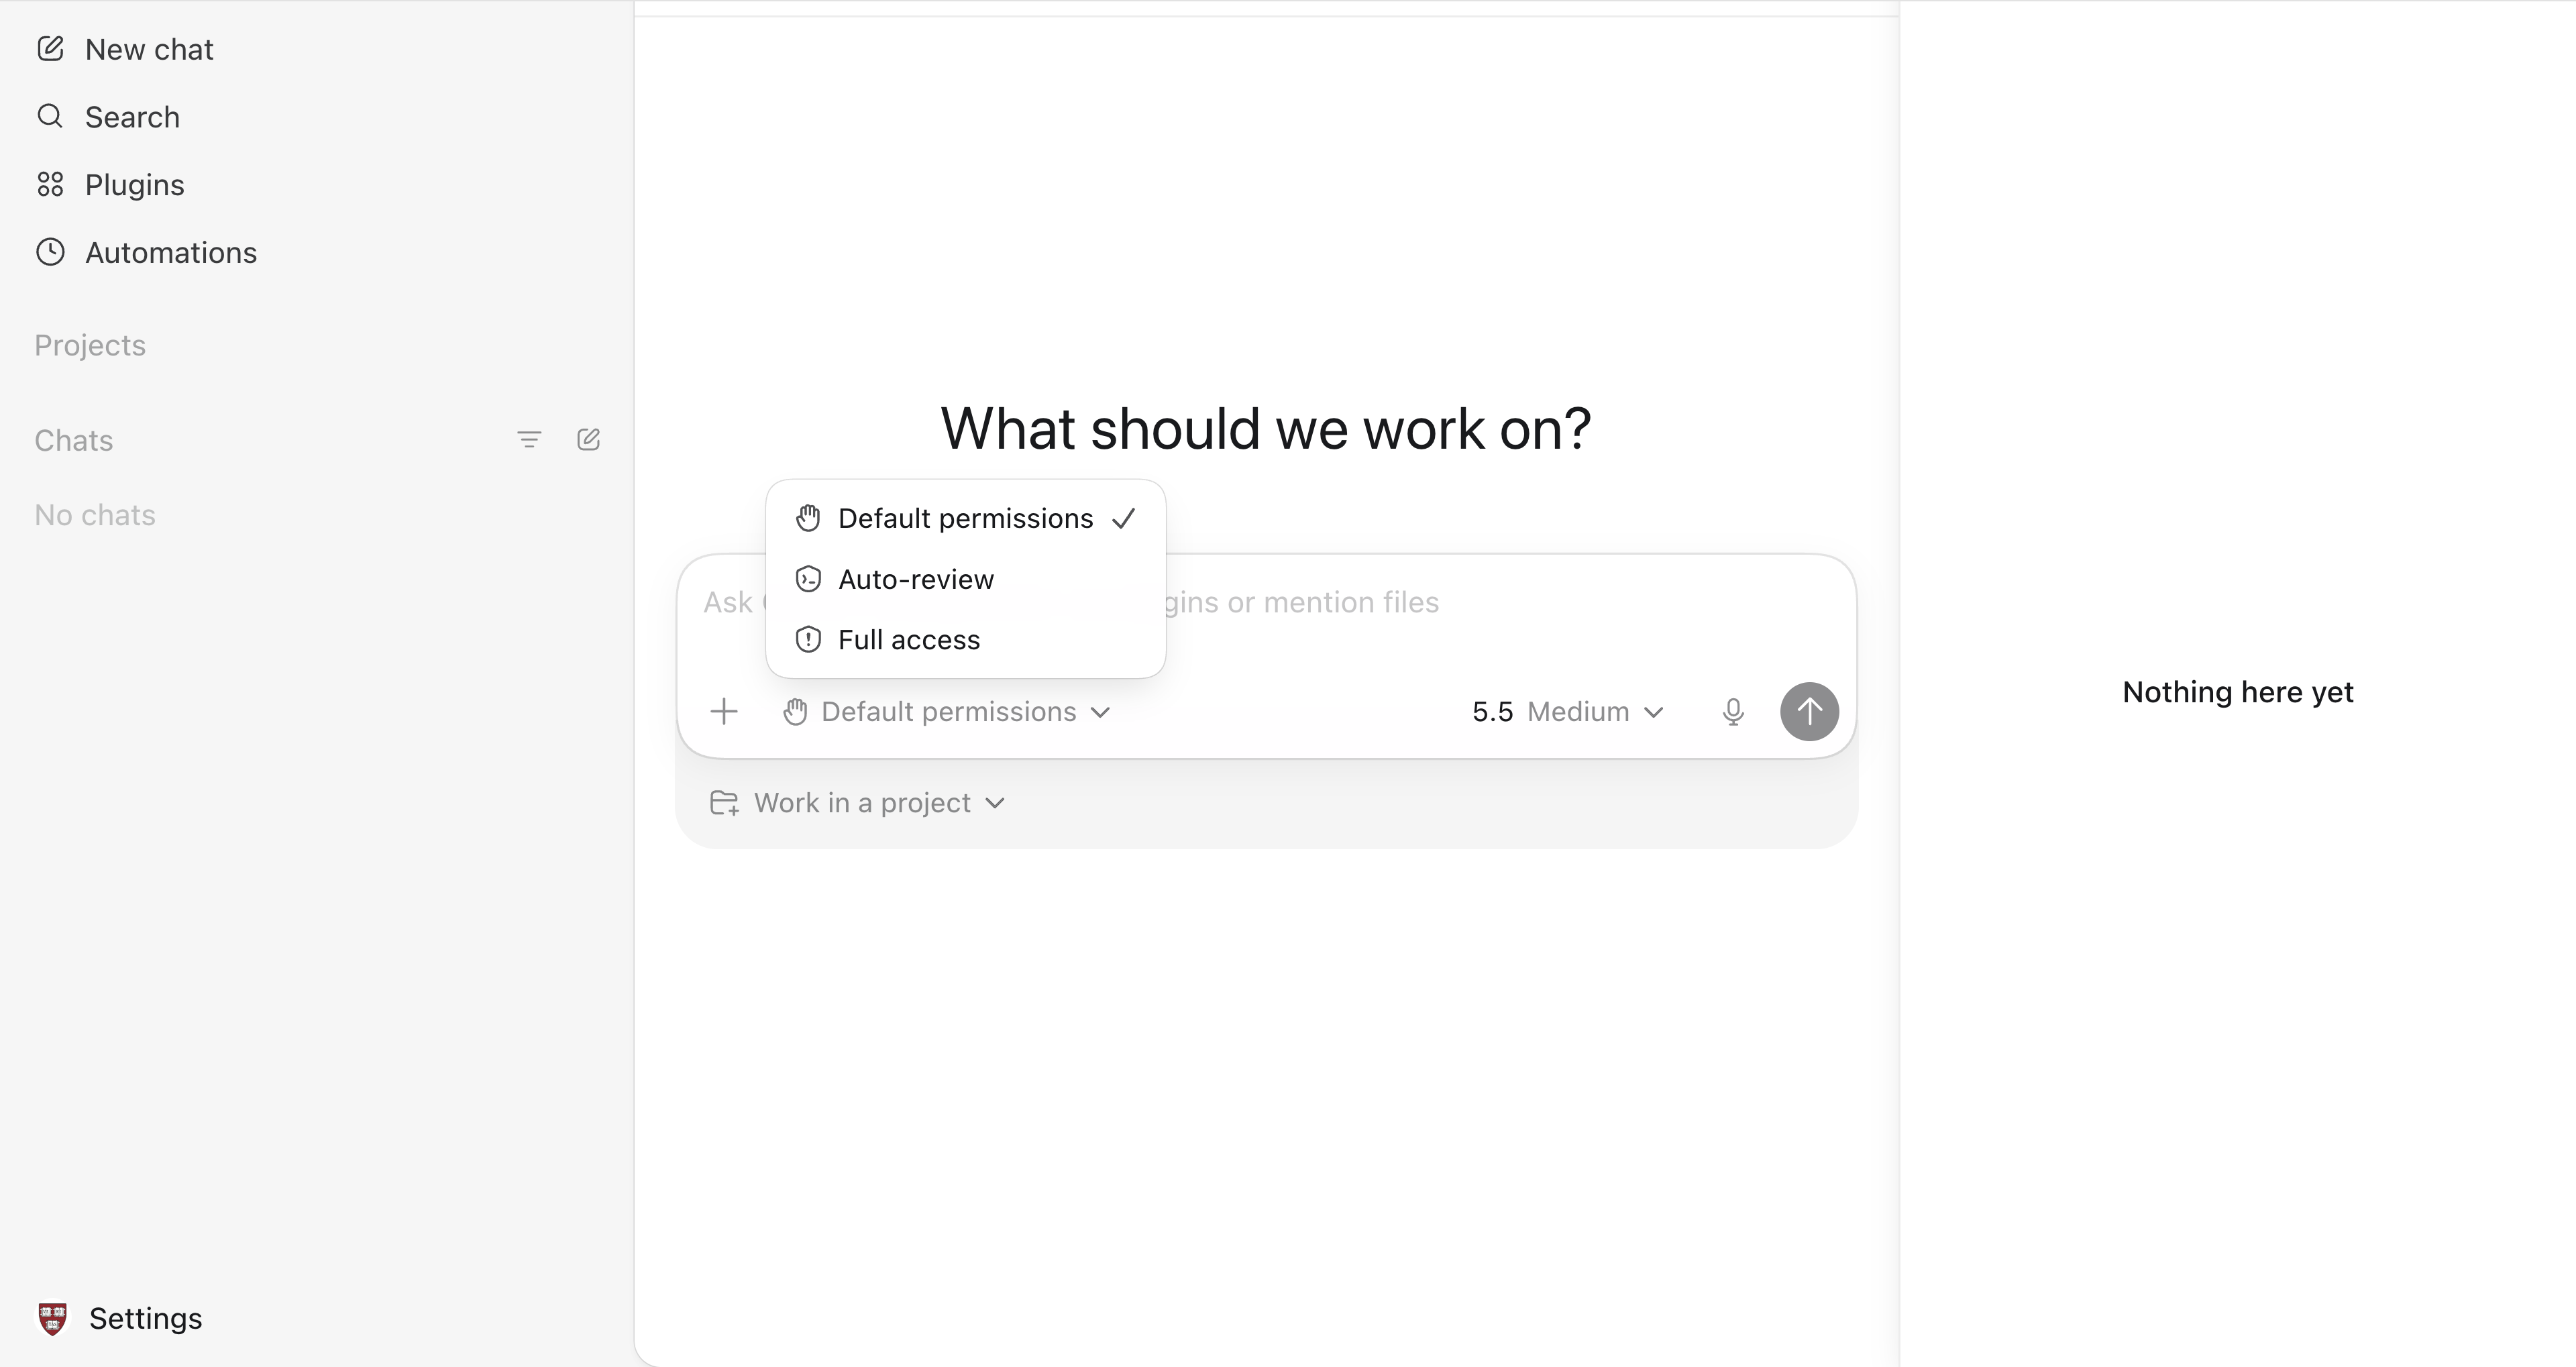
All three modes treat files inside your project folder the same way: Codex can read and edit them freely. What differs is how the agent handles requests for additional access — running shell commands, accessing the network, touching files outside the project folder.
| Mode | Inside the project folder | Additional access requests |
|---|---|---|
| Default permissions ✋ (default, recommended) | Read and edit freely | You are asked to approve each one. The most cautious of the three modes. |
| Auto-review | Read and edit freely | Codex itself reviews the request and decides whether to allow it — no human in the loop. Faster, but the agent’s auto-review can make mistakes. |
| Full access ⚠ | Read and edit freely | Always allowed, no review. Codex can edit any file on your computer and run any command, including network calls, without asking. |
The mental model: Default keeps a human in the loop for elevated access. Auto-review keeps the agent in the loop — faster, but the loop is fallible. Full access removes the loop entirely.
Important
Today, stay in Default permissions. Do not switch modes during this workshop. The default is safe enough to be useful and cautious enough that you can see what the agent is about to do at each step.
Note
Two related controls students sometimes confuse.
- The model + reasoning effort selector (
5.5 Medium, to the right of the permissions selector) chooses which model to use and how hard it thinks. Higher reasoning → slower, more thorough. Independent of permissions. - Lower-level sandbox controls (OS-enforced isolation — Seatbelt on macOS, native Sandbox on Windows) live under Settings. We do not change them today. The permission mode you pick here is enough.
Step 6 — A tour of Codex Desktop’s Settings
Click Settings at the bottom-left of the sidebar (the entry next to the Harvard shield). Settings is where Codex Desktop’s long-running configuration lives — things you set once per laptop or once per project, rather than per-message. The Settings page has a left-side menu of about a dozen tabs. We look at one tab today — General — which holds everything that matters for this workshop; explore the rest on your own.
General
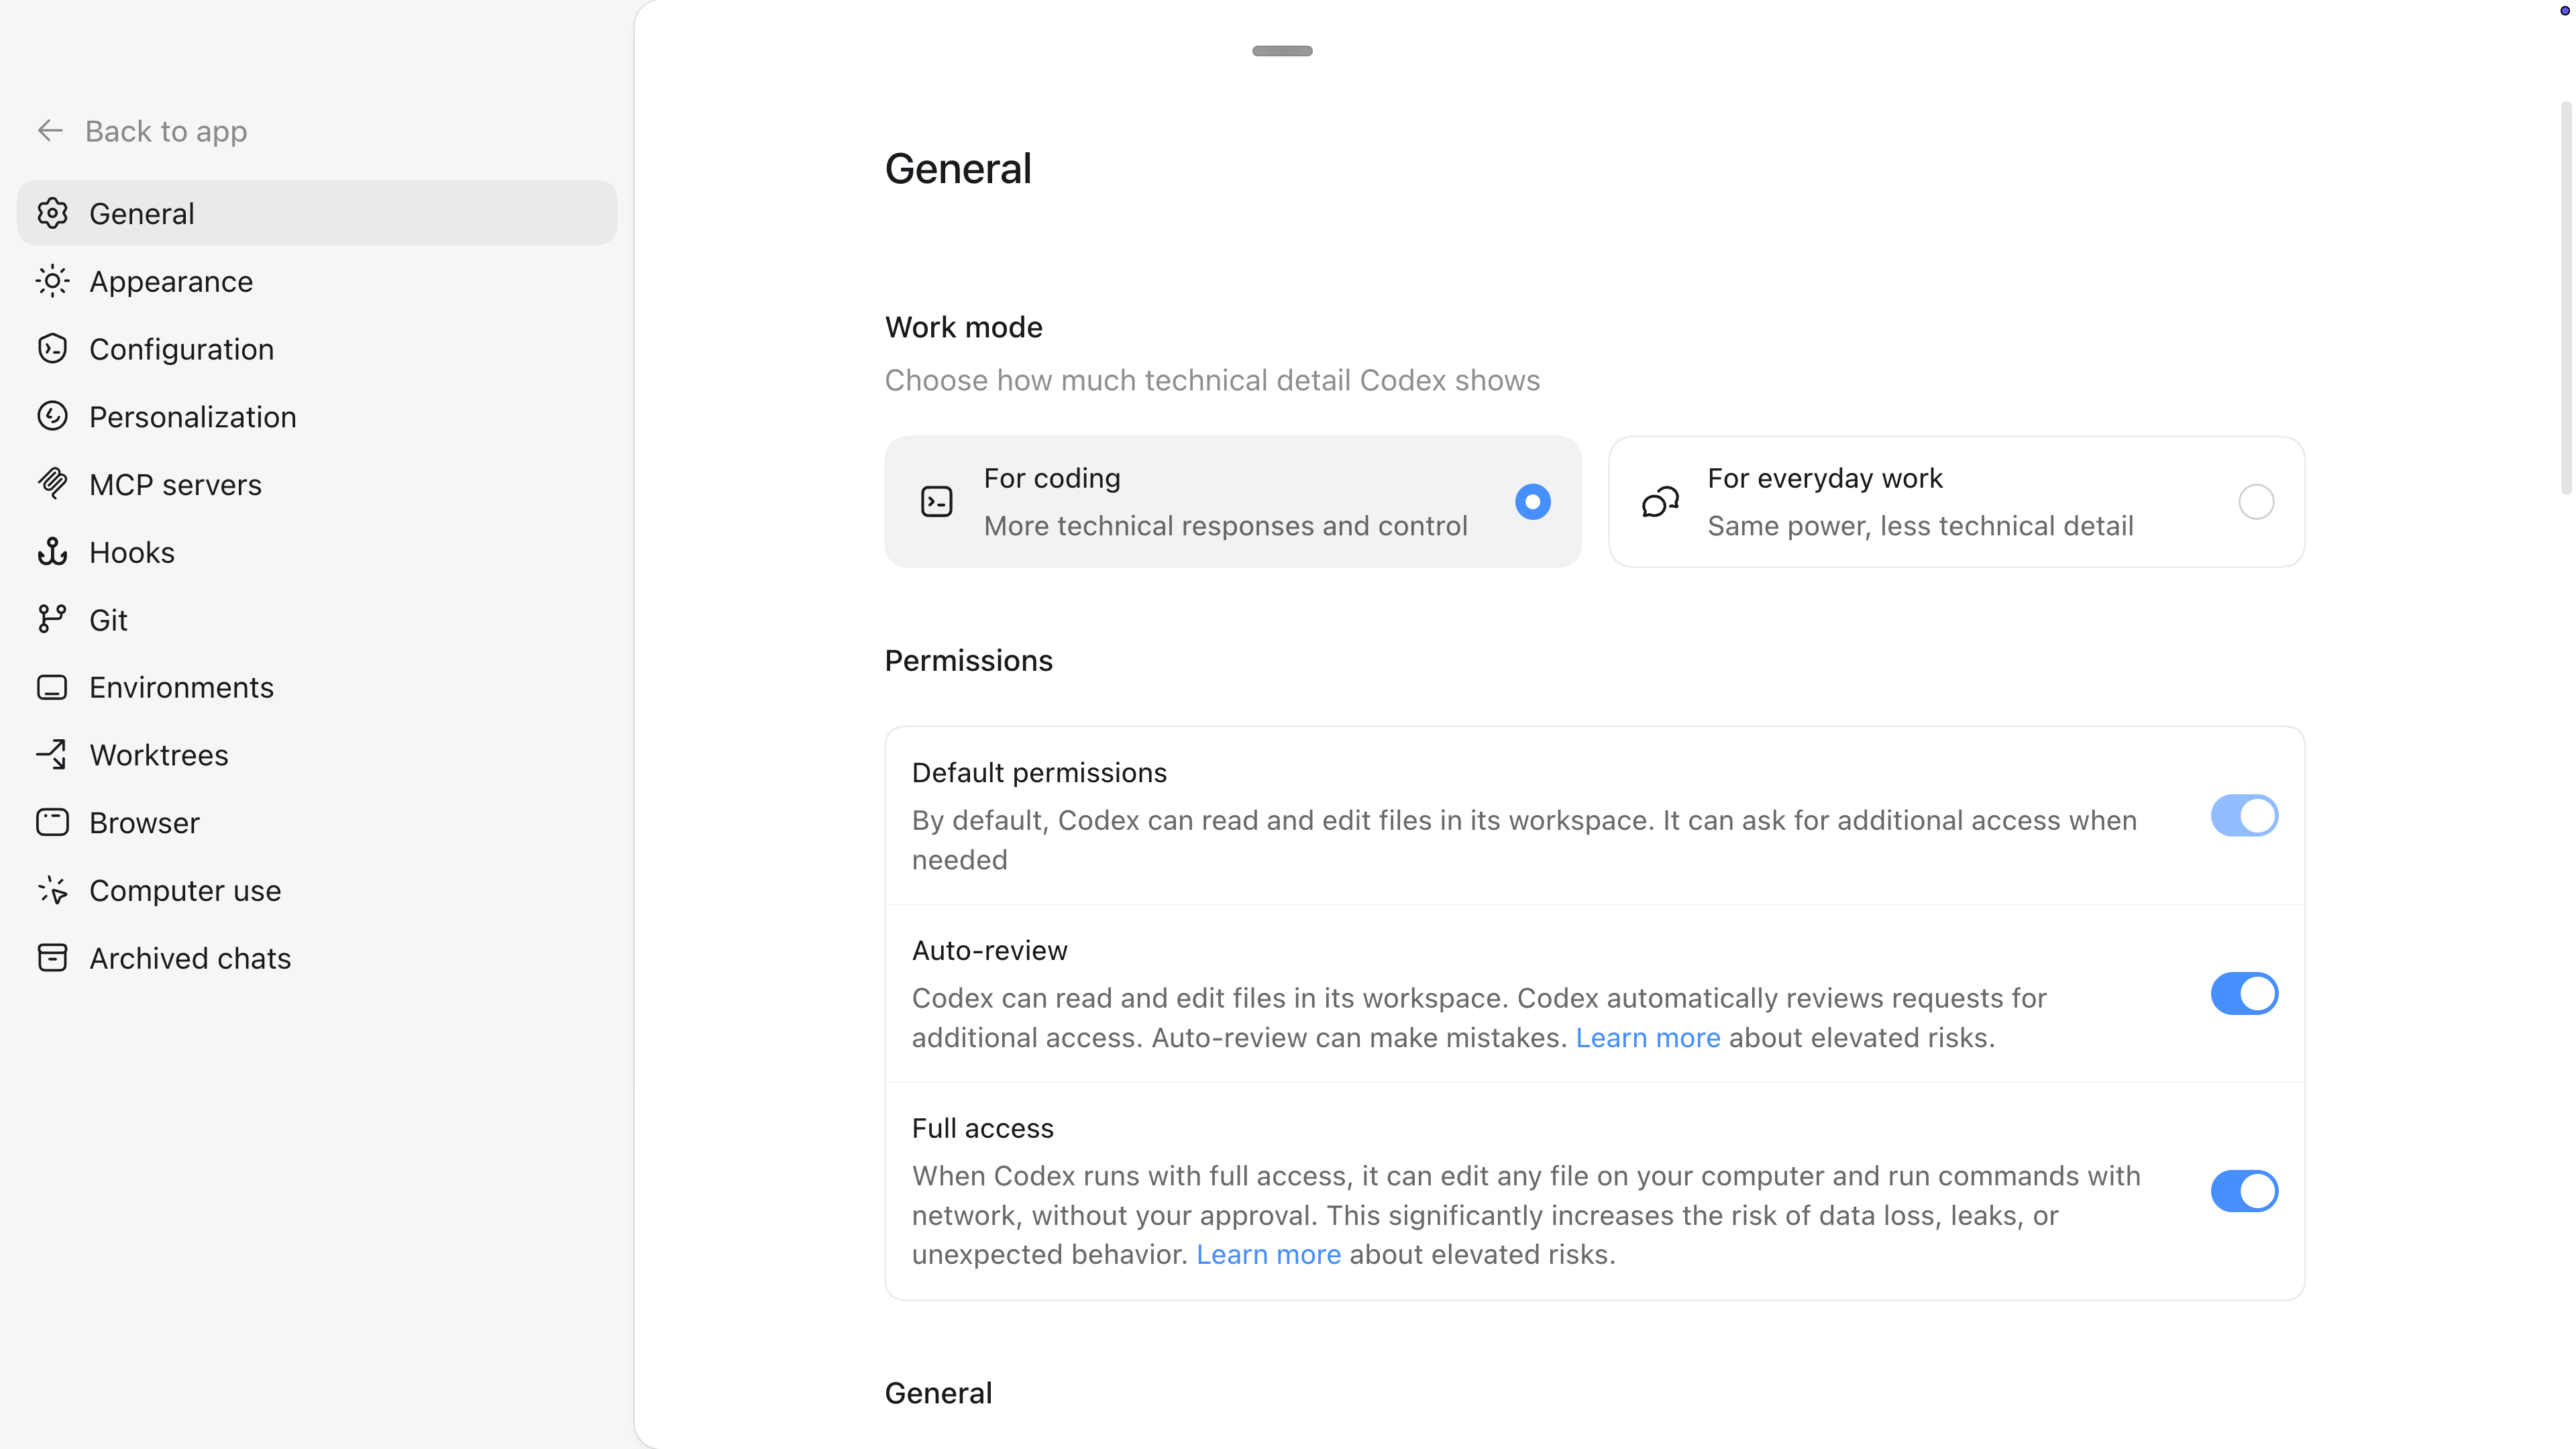
The General tab has two distinct blocks:
Work mode
| Mode | What it does |
|---|---|
| For coding (selected here) | “More technical responses and control.” Codex shows you the shell commands it ran, file diffs, raw output. Right for participants who want to see what the agent is doing under the hood. |
| For everyday work | “Same power, less technical detail.” The agent gives plainer explanations and hides routine plumbing. Right for participants who plan to use Codex primarily for non-coding tasks (writing, research, document processing). |
For this workshop choose For coding so the demos in later sessions stay legible.
Permissions
The same three modes you met in Step 5 (Default permissions, Auto-review, Full access), now shown here with OpenAI’s authoritative descriptions next to each. Two things worth pointing out about this view:
- The descriptions on this page are the ones to trust if there is ever any ambiguity. Default permissions: “By default, Codex can read and edit files in its workspace. It can ask for additional access when needed.” Auto-review: “Codex can read and edit files in its workspace. Codex automatically reviews requests for additional access. Auto-review can make mistakes.” Full access: “When Codex runs with full access, it can edit any file on your computer and run commands with network access, without your approval.”
- The toggles control whether each mode is available to choose from the bottom-of-prompt-box selector. Leave all three on; switch between them per thread.
(Below the Permissions block the General tab continues with more options — none of them are needed for this workshop.)
Step 7 — AGENTS.md, your project README for the agent
Codex reads an AGENTS.md file at startup. Think of it as a README written for the agent: project conventions, file structure, what not to touch, commit-message style, test commands.
It is loaded from (in order, highest priority first):
~/.codex/AGENTS.override.md— user-level overrides~/.codex/AGENTS.md— your personal defaults<project-root>/AGENTS.md— project-wide instructions<subfolder>/AGENTS.md— sub-project overrides
Up to 32 KiB are concatenated into the system prompt.
TipThe teaching consensus
- Keep
AGENTS.mdto about 30 lines. - Encode workflows (how to run tests, commit message format, ticket-prefix conventions), not personality or full architecture.
- Update it when you find yourself correcting the agent on the same thing twice.
Create one now. In Codex Desktop, ask:
Create an AGENTS.md in this folder with the following content:

# AGENTS.md

This is my workshop folder for the 2026 DCI Summer Workshop, Day 1 Session 3.
Anything I create here today is throwaway practice, not real work.

## Conventions for this folder
- When you write code, prefer **Python 3**. Run it with `python3`, not `python`.
- Use only the Python **standard library** — no `pip install` during the workshop.
- Before running any shell command, **print the exact command first** and wait for my approval, even when I am in Default permissions mode.
- Explain what you are doing in plain English. No technical jargon unless I ask for it.

## Don't
- Don't touch files outside `~/genai-workshop/`. This folder is my workshop sandbox.
- Don't install Homebrew or `npm` packages without asking me first.
Codex will propose creating the file. Approve. The file appears in the Review pane (and on disk inside your project folder).
Now test that it loaded. Ask:
According to this project's AGENTS.md, what language should you use when writing code, and are there any packages you should not install?The agent should answer based on the AGENTS.md you just wrote — proving that the instruction file is in the system prompt, not just sitting on disk.
Step 8 — Your first real task
Time to use Codex for something useful. The task: inspect this folder and create a workshop-notes file you will fill in over the next four days.
In the Codex prompt box, send:
First, run `ls` to show me what is in this folder.

Then create a file called notes.md with this structure:

# 2026 DCI Summer Workshop — My Notes

## Day 1 — What I learned
(to fill in)

## Day 2 — What I learned
(to fill in)

## Questions for tomorrow
(to fill in)

## Random thoughts
(to fill in)

After you create the file, run `ls` again so I can see the new file is there.
Codex should:
- Propose the
lscommand and pause for approval. Both because you are in Default permissions mode and because yourAGENTS.mdsays “print the exact command before running it.” Approve. - Show the folder contents — right now just
AGENTS.md. - Propose creating
notes.md. File writes inside the project are auto-allowed in Default permissions, so this step does not prompt; the new file appears in the Review pane on the right for you to inspect. - Run
lsagain. Show bothAGENTS.mdandnotes.mdexist.
You can click into any tool call in the chat to expand the command and its output.
Open notes.md in your favourite editor (or Finder → right-click → Open With → TextEdit) to verify the structure. This is the file you will fill in during breaks over the next four days. Open it now and add one bullet under “Day 1 — What I learned” — anything that has clicked for you so far this morning.
Important
Watch the agent loop happen. Codex showed you the command before running it, paused for approval, ran it, reported the result, then moved to the next step. Read each step before you approve. This is how you learn what tools the agent actually has.
If you stop noticing what the agent does, you have lost the plot — delegation is not abdication.
TipWhat if Codex tries to install something?
Your AGENTS.md says “no pip install” and “ask before installing Homebrew packages.” If Codex tries to install anything during today’s task — decline and ask why. This is a teaching moment: AGENTS.md does not just sit on disk, it shapes the agent’s behaviour. The notes.md task needs no installations.
Coming up in Session 4
In Session 4 (14:30 — Deterministic vs Non-Deterministic) you will:
- Use Codex Desktop to run two scripts that extract Chinese personal names from a small newspaper corpus.
- See the regex approach produce identical output across three runs (deterministic).
- See the LM Studio API approach produce different output across three runs of the same task (non-deterministic).
- Learn the system-prompt vs user-prompt distinction by making one curl call against LM Studio’s local API.
- Map the contrast back to the Four Pillars, with the Models pillar sliding from absent → tiny → bigger.
At the end of Session 4 we set you up to install Git and the GitHub CLI as homework tonight. Both are needed for Day 2 morning, where we build and deploy your personal website. Do the homework on hotel Wi-Fi, not in class — the first git command on macOS can trigger a ~20-minute Xcode Command Line Tools install dialog, and you do not want to fight conference Wi-Fi for that.
Summary — what you should take away
- Know where your files are. Home folder, the five standard subfolders, the cloud-sync trap, hidden files. This is the prerequisite to every other lesson this week.
- Agents = LLM + tools + a loop. The model is the same family you used in chat; the harness around it is much more powerful.
- One agent, transferable skills. Codex, Claude Code, Opencode, and the rest share the pattern — instruction file, MCP, permission flow, sandbox.
- Permission modes are the safety story. Stay in Default permissions unless you have a specific reason to switch. Watch what the agent proposes; do not auto-approve.
- AGENTS.md is the most important config you write. A short, opinionated, workflow-oriented file beats a long description of your project. It shapes how the agent behaves before you type a single user prompt.
- The agent loop is visible. Read each step. Delegation is not abdication.
References
- Codex documentation hub
- Codex IDE and desktop overview — installation, sign-in, project picker
- Codex GitHub repo — Apache 2.0
- Codex quickstart
- Codex best practices — the four-element prompt: goal / context / constraints / done-when
- Codex AGENTS.md guide
- Simon Willison, How I think about Codex
- Owain Lewis, How I Use OpenAI Codex (real workflow)