Deterministic vs Non-Deterministic — Two Ways to Extract Names
Regex, APIs, and Why Reproducibility Matters — 2026 DCI Summer Workshop, Day 1 Session 4
Today’s session
You have spent the morning with an LLM in a chat window, and the afternoon delegating to an AI agent. In this last session of Day 1 you will see something different: the same research task, done two ways, with two completely different reliability profiles.
We will extract personal names from a corpus of modern-Chinese newspaper sentences. Once with a regular expression. Once by asking an LLM through LM Studio’s API. Then we will compare what we got and name what we saw.
Teaching goal: by the end you should be able to look at any research task and ask the right diagnostic question — “is this task deterministic or non-deterministic, and which do I want?” That single question reframes most arguments about when to use a script and when to use an LLM.
Download session_04_materials.zip — everything below in one bundle.
Or grab individual files:
extract_names_regex.py— the deterministic regex extractorextract_names_api.py— the LM Studio API extractorsentences.txt— 20 sample modern-Chinese sentences (the corpus)baijiaxing.txt— Hundred Family Surnames list used by the regexsystem_prompt.txt— system prompt for the API extractor- Reference outputs:
regex_output.csv,api_output.csv, and per-model runs (qwen08b run 1/run 2/run 3,qwen9b run 1/run 2/run 3) README.md— what’s in the folder and how to run things
The concept — deterministic vs non-deterministic
A deterministic system gives the same output for the same input, every time. A non-deterministic system does not.
| Deterministic | Non-deterministic |
|---|---|
| A calculator | A coin flip |
sort([3, 1, 2]) → always [1, 2, 3] |
“Give me a random number between 1 and 100” → 42 some of the time, 7 other times |
| Database query with the same WHERE clause | An LLM at temperature > 0 |
Regex \d+ against a fixed string |
Asking an LLM to “find the numbers” |
Almost all software you have ever used is deterministic. Spreadsheets, search engines, even Google Translate’s classical pipeline. LLMs broke this pattern: the same model, given the same input, can produce a different answer on the next call.
For research, the cost of non-determinism is reproducibility. If your published table was generated by an LLM and the reader runs the same prompt next month, they may get a different table. Determinism is not just a technical curiosity; it is the difference between a research artefact your reader can verify and a research artefact they must trust.
We are about to make this concrete.
The task
Extract every personal name from a small corpus of modern-Chinese newspaper sentences. The output should be a CSV: one row per name found, with the source sentence next to it.
Why names? It is the smallest task that real humanities-research pipelines actually need: prosopography, biographical-database enrichment, NER for citation networks, character lists for novels. The CBDB, JBDB, and similar databases all need this step somewhere.
We will solve it two ways:
| Approach | How it works | What we will see |
|---|---|---|
| 1. Regex + baijiaxing dictionary | Match any single-character surname from the 百家姓 list, followed by 1–2 Chinese characters. | Deterministic. Same input, same output every run. Visible false positives — the regex doesn’t know what a name is, only what a surname prefix is. |
| 2. LM Studio API + Qwen3.5 0.8B | Send each sentence to the model with a system prompt that asks for names as JSON. | Non-deterministic. Different runs give different lists. Sometimes catches names the regex missed; sometimes hallucinates names that aren’t there. |
Open the session folder
We have prepared a folder of materials for you. Open Codex Desktop, and Open folder at:
~/genai-workshop/session-04/The folder should already exist from the pre-workshop materials. Inside it you will find a materials/ subfolder with:
| File | What it is |
|---|---|
baijiaxing.txt |
The 102 most-common Chinese single-character surnames (from the canonical 百家姓), one per line. |
sentences.txt |
The sentence corpus we are extracting from. |
system_prompt.txt |
The Chinese NER instruction we will send to the LLM. |
extract_names_regex.py |
The deterministic regex script. |
extract_names_api.py |
The non-deterministic LM Studio API script. |
README.md |
What each file is for. |
You will not type any of this code yourself today. Codex orchestrates: it reads the scripts, runs them, and explains them when you ask. Each of you will look at the same code on screen, because the scripts are pre-written. The point of the session is the contrast between the two outputs, not the code.
(Later in the workshop you will write code with Codex. Today we are practicing reading and running code someone else wrote — a real research skill in its own right.)
Ask Codex:
Open the README.md in the materials/ folder and summarize what each file is for.It should produce a short summary echoing the table above.
Approach 1 — Deterministic: regex + baijiaxing
A regex primer
A regular expression (regex) is a tiny pattern language for matching text. Two pieces you need today:
| Piece | What it does | Example |
|---|---|---|
[abc] |
A character class — match any one of the listed characters | [李王张] matches 李, 王, or 张 |
{1,2} |
Match the previous thing 1 to 2 times | [一-鿿]{1,2} matches 1 or 2 Chinese characters |
Our pattern is the concatenation of these two:
[百家姓 surnames] {1-2 Chinese characters}In words: “a surname character, followed by one or two more Chinese characters.” That is what the script does. It has no idea what a name actually is — only what a plausible surname prefix looks like.
Read the script
Ask Codex:
Open extract_names_regex.py and explain what it does, line by line.Codex should walk through:
- Read the surname list into a Python list.
- Build a character-class regex from that list.
- Read the sentences file.
- For each sentence, find all matches.
- Write one row per match to
regex_output.csv.
The script is short enough to read in one sitting. If anything is unclear, ask Codex about that specific line — “explain line 22” works.
Run it three times
Run extract_names_regex.py from the materials folder. Then run it again. Then run it a third time. Show me the output each time.Look at the output. All three runs are identical. That is what deterministic means in practice.
Open regex_output.csv (Codex can show it, or open it in Numbers / Excel). On the prepared 20-sentence corpus you will see 48 rows (three of them empty no-match rows), in three categories:
- Real names correctly extracted — 王小明 (#1), 张宝彤 (#6), 孙存周 + 孙叔容 (#7), 谢觉哉 (#9), 顾炎武 (#11), 王景 (#12), 平当 (#14), 李垂 + 张商英 + 黄绾 (#15), 黄兴 + 蔡锷 + 毛泽东 + 蔡和森 (#19).
- Real names with trailing noise —
李华和(should be 李华 — 和 is a conjunction),张伟一,陈潢等,朱熹的. The regex’s greedy{1,2}quantifier captures one extra character whenever the next character is also Chinese. - Pure false positives —
周年的(#7),安碧珈(from the building name 娜安碧珈楼, #8),黄实践+水人物(#12),时候(#18),元代贾+鲁治河+方面有(#17). Every one of these is a baijiaxing-surname character mid-sentence followed by 1–2 more Chinese characters. The regex has no idea any of these are not names.
Look at sentence 16: 当时范百禄等认为…. The actual name in this sentence is 范百禄 (Fan Bailu, Song-dynasty official). What did the regex extract?
时范百
The character 时 is a baijiaxing surname. The regex hits 时 first, greedily takes 范百 as the “1–2 characters after the surname,” and the actual name 范百禄 disappears entirely from the output. One match produced both a false positive (时范百) and a false negative (the loss of 范百禄).
Sentence 17 has the same kind of failure: 元代贾 consumes the start of 贾鲁, and 贾鲁 is gone.
This is the clearest demonstration in the corpus of what determinism cannot buy you. The regex does exactly what it was told to do. It does not know what a name is, and it cannot back up after a wrong start.
Determinism comes free; semantic understanding does not. The regex finds sequences that start with a surname. It has no model of meaning, so it cannot know that 周年 means “anniversary,” or that 时 in 当时范百禄 is “at the time” rather than a surname.
It is also blind to anything outside the dictionary: sentence 8’s Japanese name 濑尾澄江 is missed completely — no Chinese surname character starts it, so the script never even tries.
Approach 2 — Non-deterministic: LM Studio API
We will reach the same goal a different way, in three steps, each adding one new idea.
Step 2a — Do one sentence by hand in the LM Studio GUI
Open LM Studio. Make sure Qwen3.5 0.8B is loaded (the same model from Session 02).
In the chat window, type:
Extract personal names from this Chinese sentence and return them as a JSON array. If none, return [].

王小明今天去了北京大学。
The model should reply with something like ["王小明"].
This is the manual version of what we are about to scale. The model can do the task, but you had to retype the instructions every time. That is annoying — and it is also the entire point of the next step.
Step 2b — System prompt vs user prompt; one call with curl
Two new concepts, side by side:
| What it is | When it changes | |
|---|---|---|
| System prompt | A persistent instruction given to the model before the conversation. Sets persona, rules, output format. | Set once per session. |
| User prompt | What you type each turn. The actual question or input. | Changes every turn. |
We will tell the model “you are a Chinese NER tool, return JSON only” once, in the system prompt. Then every user prompt is just the sentence. Three benefits:
- We stop retyping instructions.
- The model is more consistent because the system prompt has higher priority than the user prompt.
- The user prompt becomes pure data — exactly what a script needs to fill in.
Set the system prompt in LM Studio
- In LM Studio’s chat panel, find the System Prompt field (right-side settings panel; in older versions: “Pre-prompt”).
- Open
materials/system_prompt.txtin Codex and copy its contents. - Paste it into LM Studio’s system-prompt field. Save.
- Now type any sentence into the chat as a user prompt — just the sentence, no instructions. The model should reply with the JSON array.
The shift from “everything in one user prompt” to “system prompt + clean user prompt” is one of the most useful habits to pick up from this workshop. It is also exactly the structure that AGENTS.md uses for AI coding agents (an AGENTS.md is, technically, a system prompt for Codex).
Start LM Studio’s local API server
LM Studio is also an API server, not just a chat app. Open it like this:
- In LM Studio’s left sidebar, click the Developer tab (older builds: Local Server).
- Toggle Status: Stopped → Running at the top of the page. The endpoint appears, usually
http://localhost:1234. - Leave Qwen3.5 0.8B loaded on the chat side.
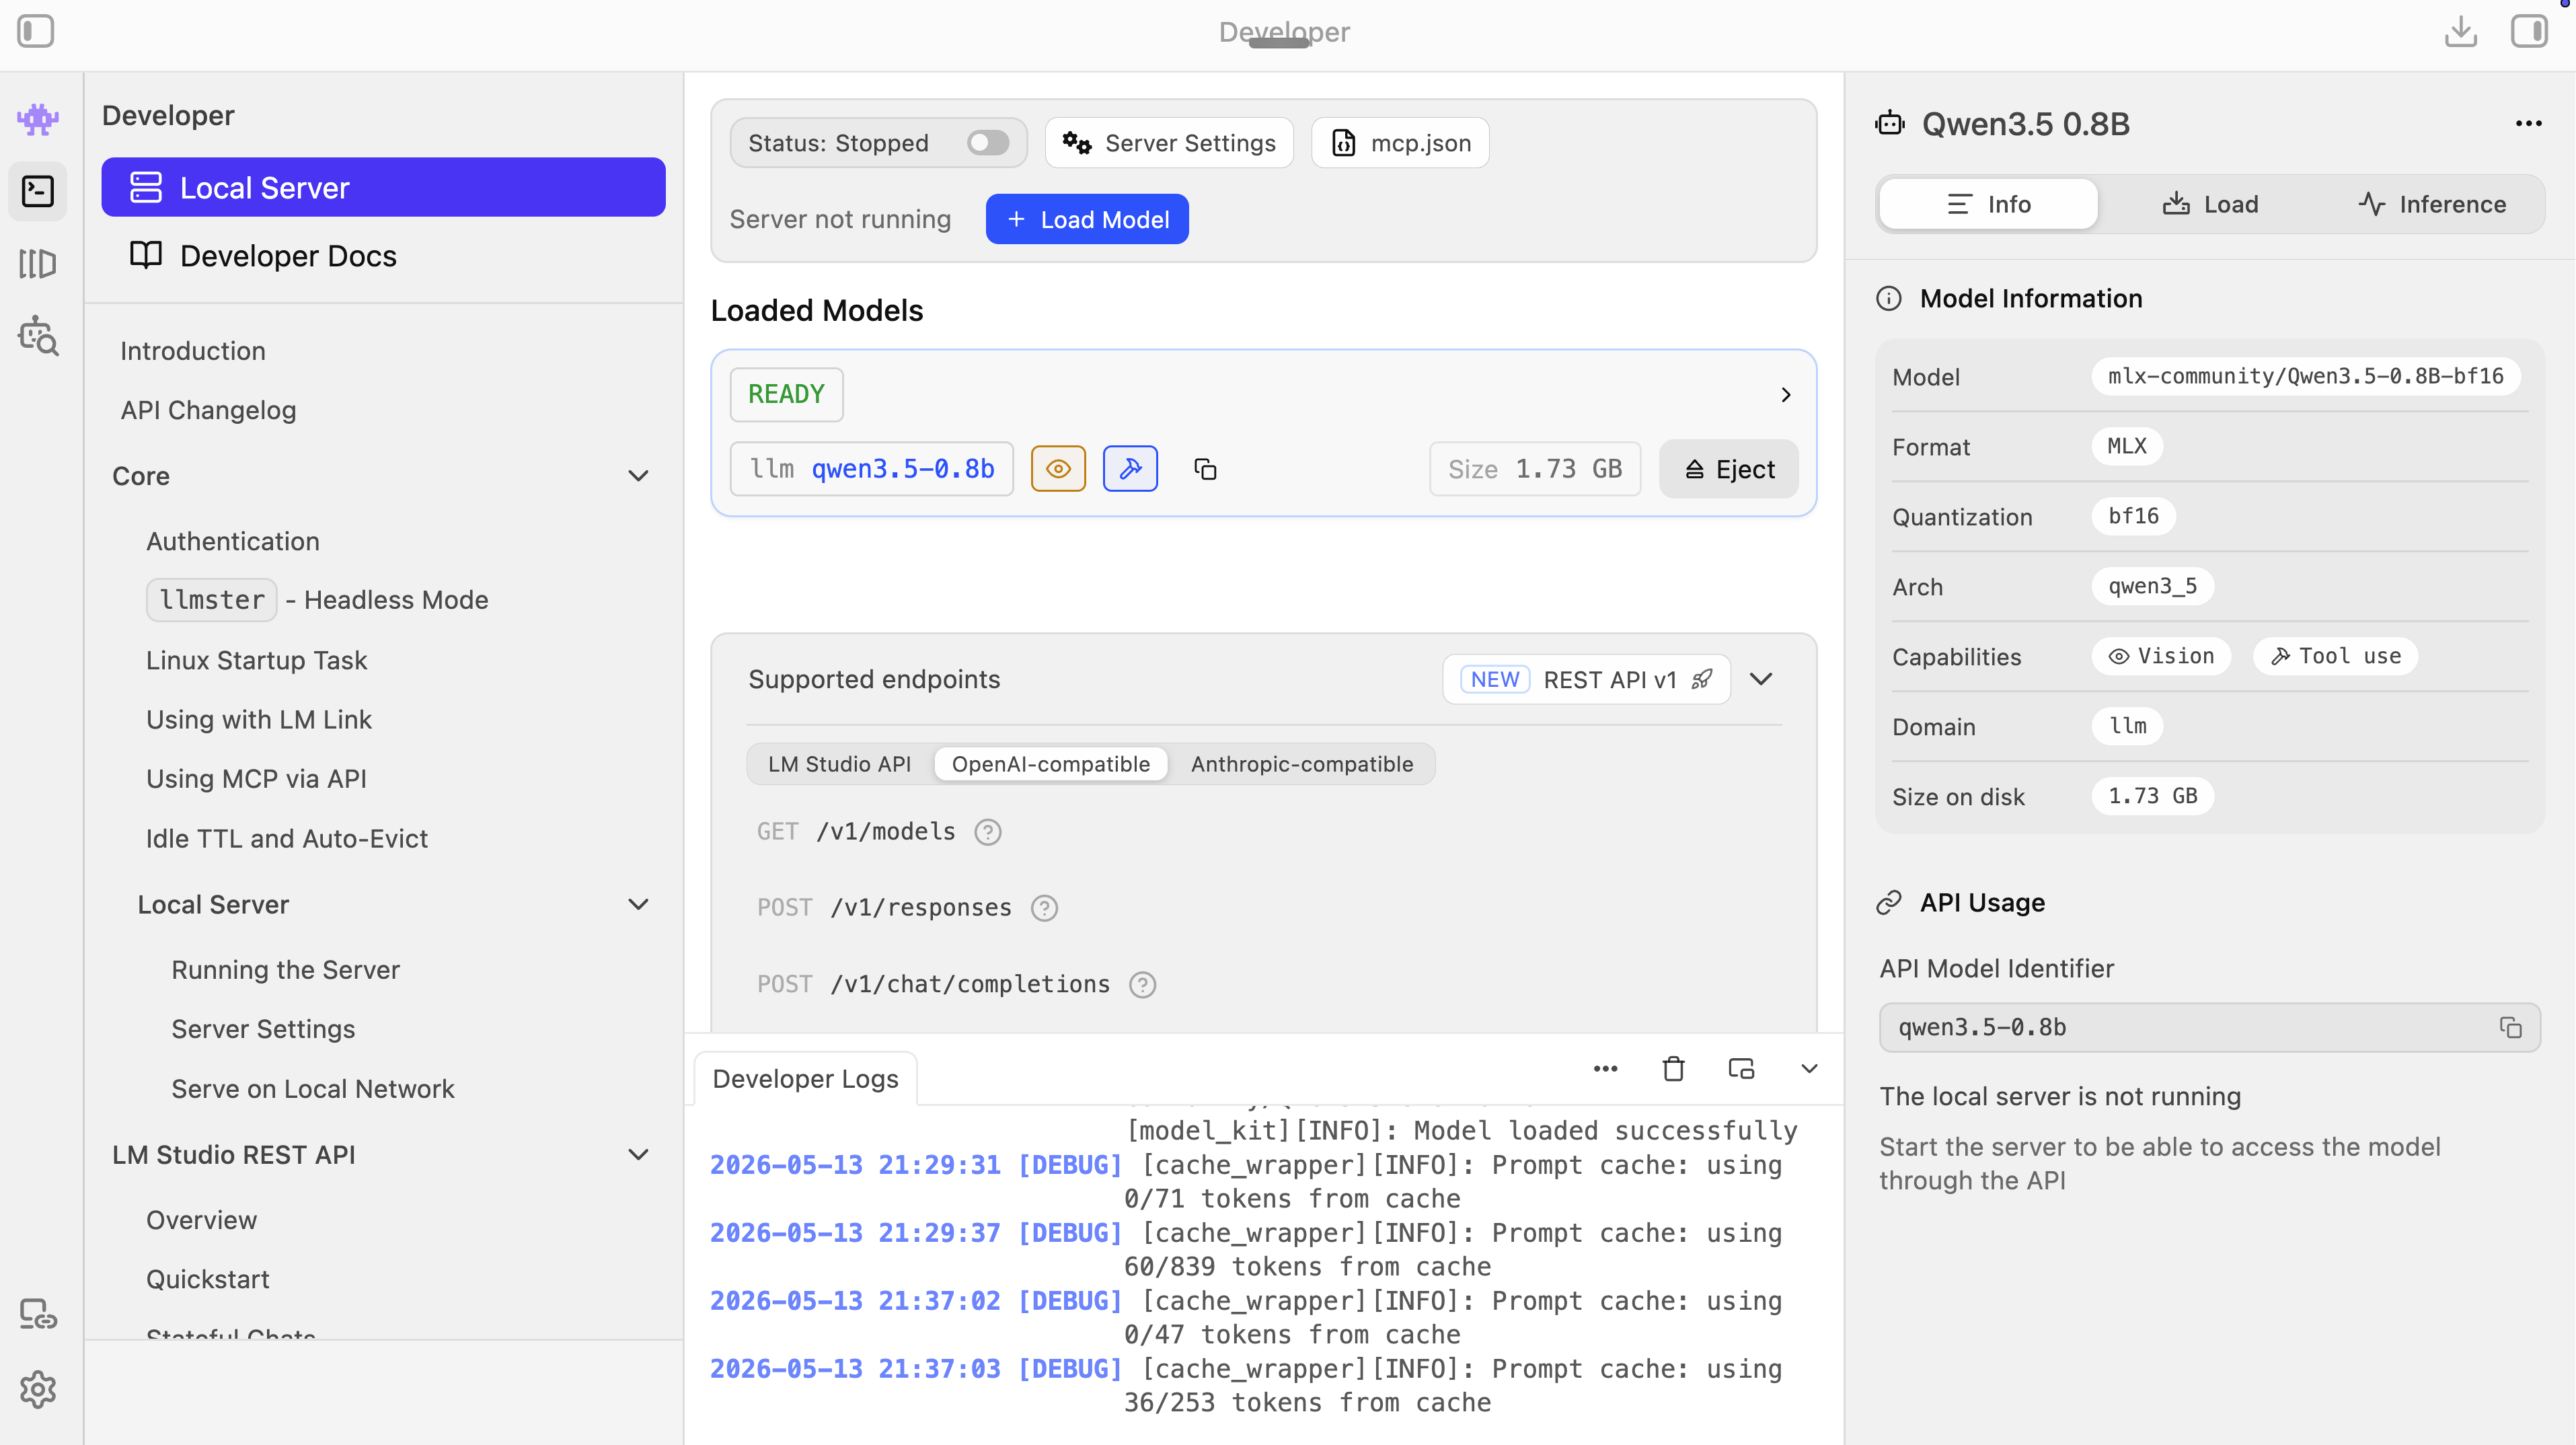
qwen3.5-0.8b is at the top; the three API-format tabs and the three OpenAI-compatible endpoints are in the middle; the API model identifier is on the right.Three API “styles” and three endpoints
LM Studio is unusual in exposing three different wire formats for the same loaded model — three different ways of structuring the JSON request and response. You see them as three tabs under “Supported endpoints”:
| Tab | What it is | When you use it |
|---|---|---|
| LM Studio API | LM Studio’s own native format | Tied to LM Studio. Useful for LM-Studio-specific features (per-request MCP, etc.). |
| OpenAI-compatible | Identical wire format to OpenAI’s API | The default we use. Any code written for OpenAI (the openai Python SDK, our curl call, our script) just works. |
| Anthropic-compatible | Identical wire format to Claude’s API | For code written against Anthropic’s SDK. |
The same loaded model serves all three formats simultaneously. You pick whichever your client knows how to speak.
Under the OpenAI-compatible tab you see three endpoints:
| Endpoint | What it returns | Why it exists |
|---|---|---|
GET /v1/models |
A JSON list of loaded models with their IDs | How a client discovers what models are available. Useful when you don’t know what to put in "model": "...". |
POST /v1/chat/completions |
An assistant reply to a list of {role, content} messages |
The classic OpenAI chat format. Released 2023; still the default in 90% of tutorials and existing code. Our script uses this one. |
POST /v1/responses |
A more structured response with built-in tool, file, and stateful-conversation support | The newer OpenAI Responses API (introduced 2025). Functionally a successor to chat/completions, but adoption is still partial. |
For this workshop you only need /v1/chat/completions. It is the format every cloud LLM provider speaks one way or another, and it is what every script we run today targets.
CORS — and why it doesn’t matter for us
Open Server Settings (the gear icon next to the Status toggle). You will see a list of server-level options.
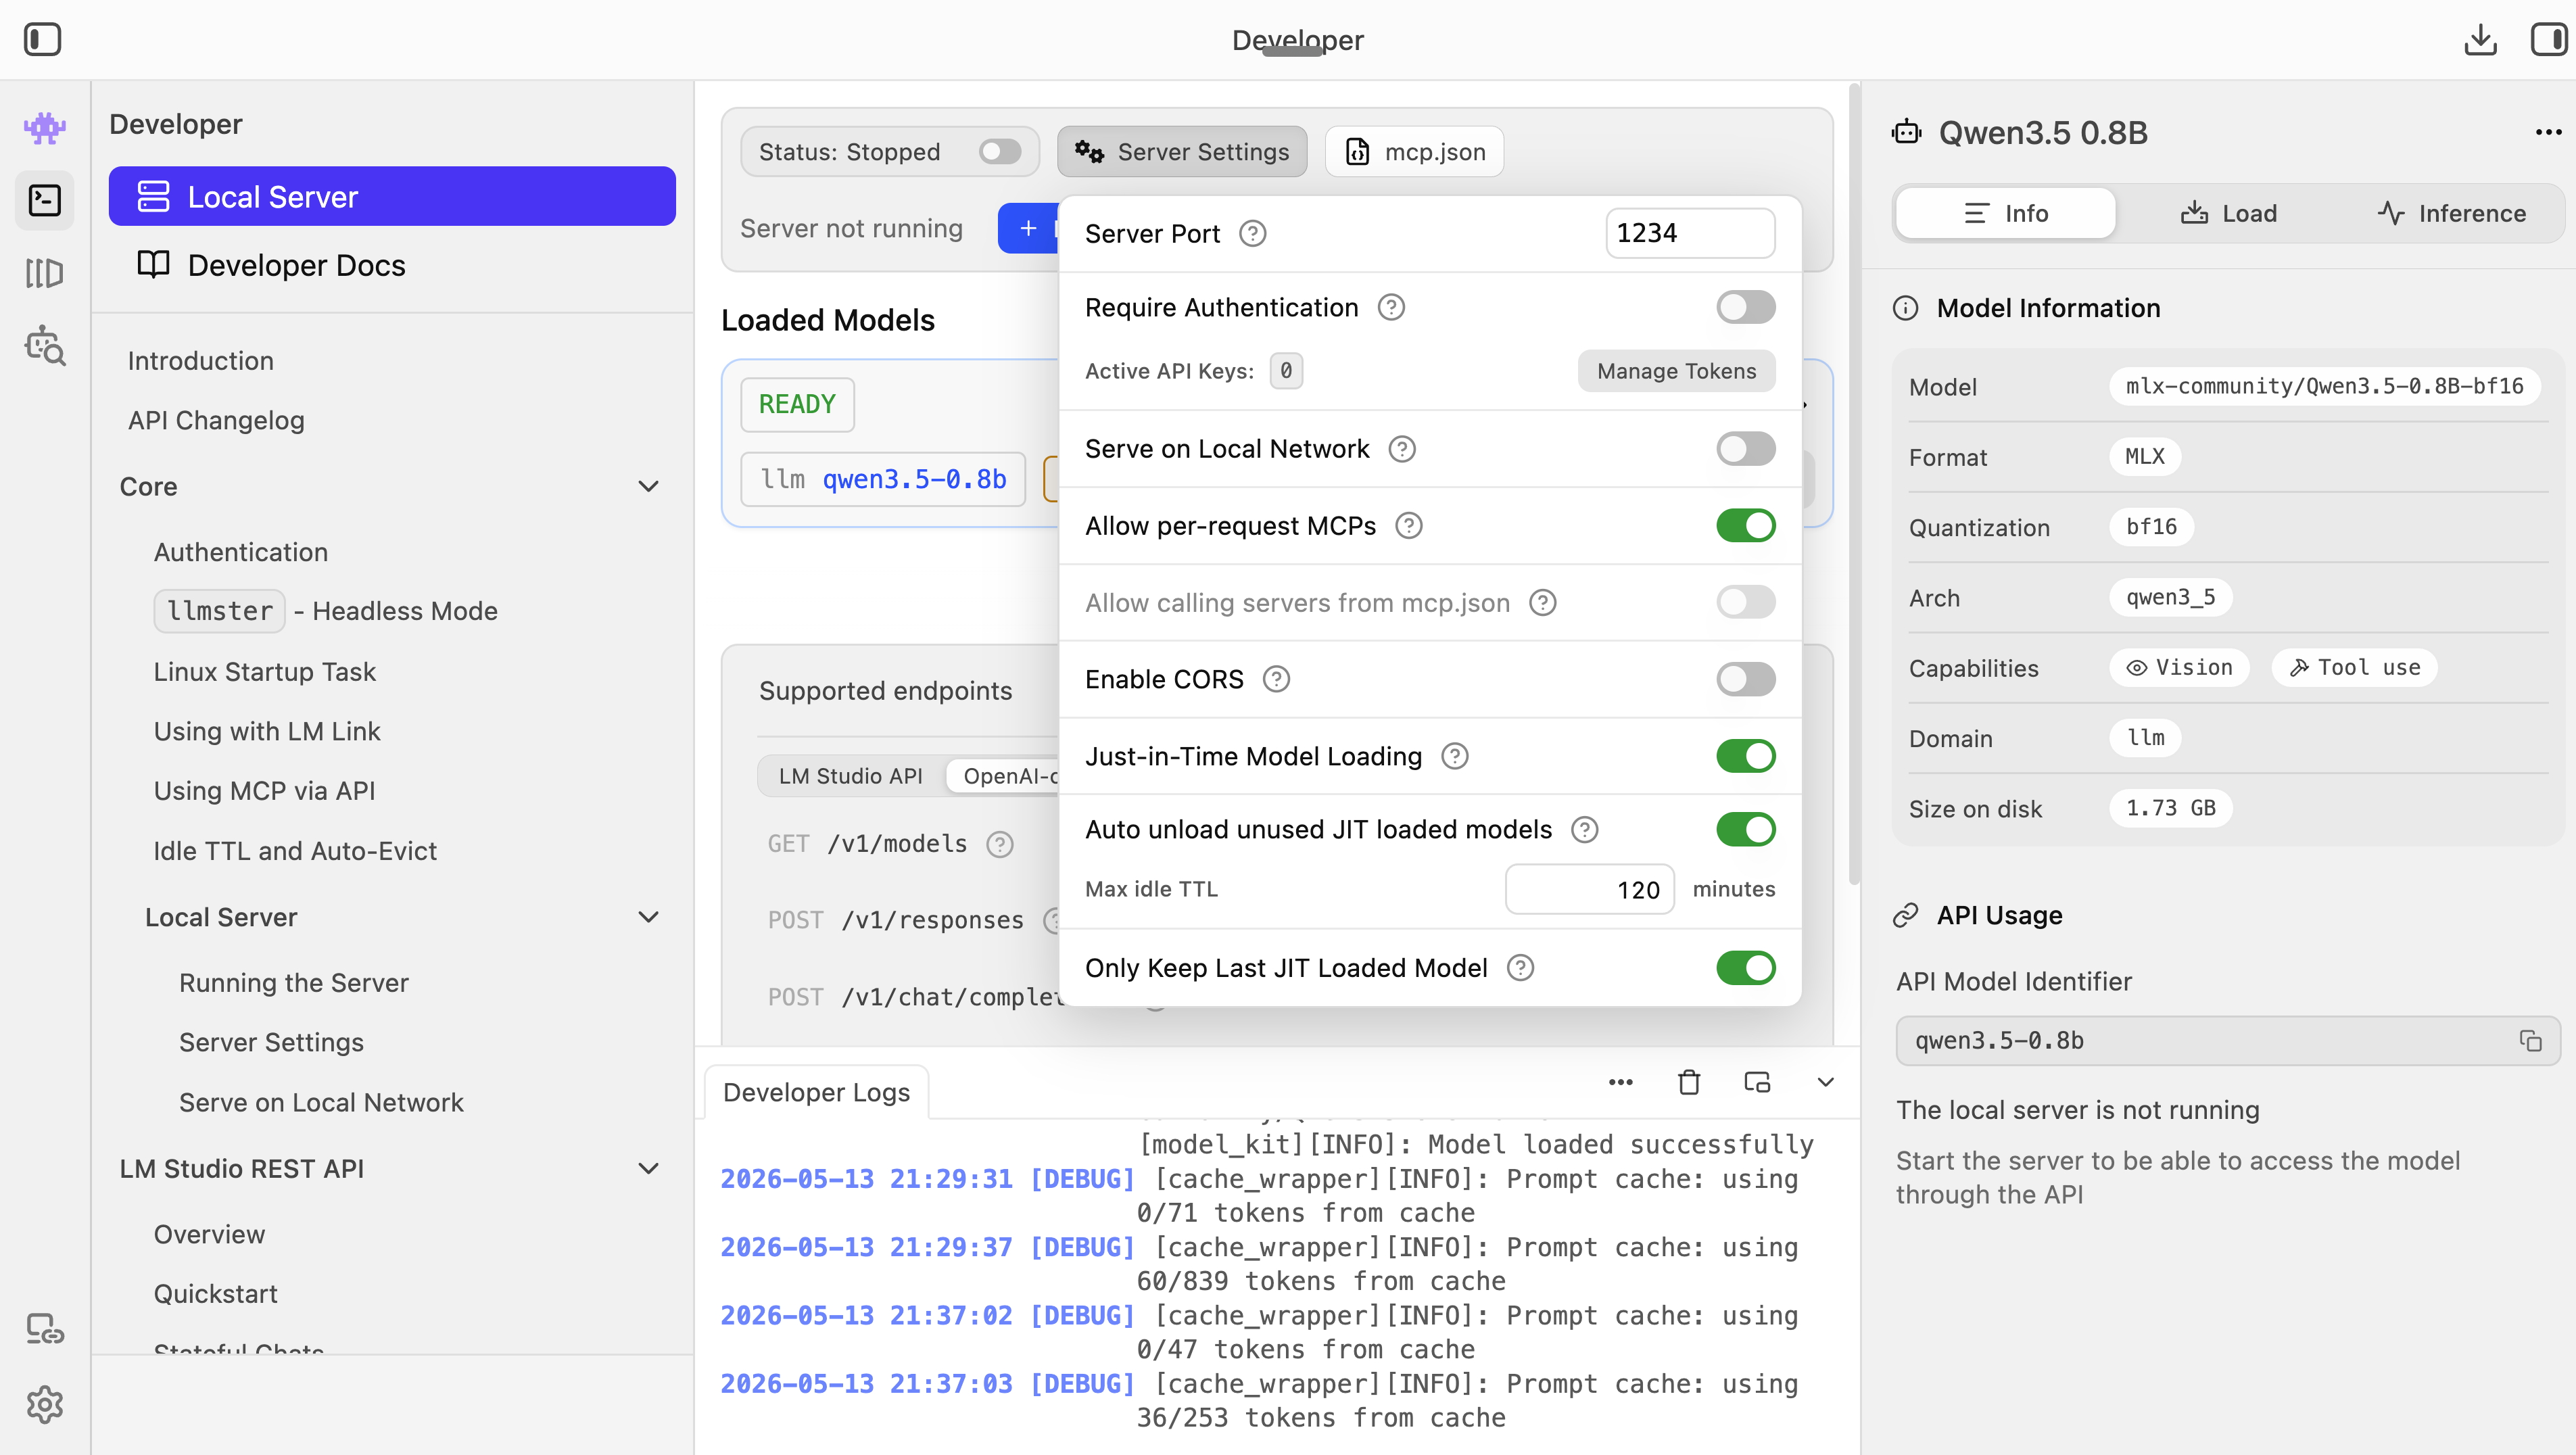
The one worth understanding today is Enable CORS.
CORS stands for Cross-Origin Resource Sharing. It is a browser security rule: a JavaScript app loaded from one website cannot make API calls to a different one unless the target website explicitly permits it (by sending the right HTTP headers).
- CORS off (your current setting, and the default): a web page running in your browser cannot call
http://localhost:1234. Python scripts,curl, and Codex are unaffected — they are not browsers and they do not enforce CORS. - CORS on: LM Studio adds the headers a browser needs to permit the call. Turn this on only if you build a web-based UI that calls LM Studio from in-browser JavaScript.
For everything we do today, leave CORS off. Our Python script and our curl call are not browsers, so the setting has no effect on them — and leaving it off prevents a random web page you happen to visit from also being able to poke your local model.
One call with curl
Open the terminal pane inside Codex Desktop (⌘J on macOS, or the terminal icon at the top right). Paste:
curl http://localhost:1234/v1/chat/completions \
  -H "Content-Type: application/json" \
  -d '{
    "model": "qwen3.5-0.8b",
    "messages": [
      {"role": "system", "content": "你是一个中文命名实体识别工具。给定一个中文句子,请只输出其中出现的人名,以 JSON 数组格式回应。如果没有人名,回应 []。不要解释,不要加其他内容。"},
      {"role": "user", "content": "王小明今天去了北京大学。"}
    ],
    "temperature": 0.7
  }'
You should get back a JSON object. Inside choices[0].message.content you will find the model’s answer — something like ["王小明"].
The backslash line-continuations and single-quoted JSON above are macOS/Linux shell syntax and will fail in PowerShell or cmd. Easiest fix: ask Codex to “run this curl command, adapted for my shell” — converting commands between shells is exactly the kind of mechanical work the agent is for.
This is what an API call actually is. A request (JSON in), a response (JSON out), over HTTP. The browser, the Python script, and a tool like Codex all speak this same protocol — just with different ergonomics on top.
Run the curl command twice. Compare the responses. They may differ — sometimes subtly (the model returns ["王小明"] once and [ "王小明" ] the next), sometimes substantively (one run hallucinates an extra name). This is non-determinism made visible.
Step 2c — Scale it: Codex runs the API script
Open extract_names_api.py. Ask Codex:
Open extract_names_api.py and explain what it does. In particular, show me where it sends the system prompt vs the user prompt.Codex will point out:
- The system prompt is loaded once, from
system_prompt.txt. - For every sentence, a new request is built with that fixed system prompt and the sentence as the user prompt.
- The response is parsed as JSON and written to
api_output.csv.
Now run it:
Run extract_names_api.py from the materials folder. Make sure LM Studio's local server is running on http://localhost:1234. Show me the printed progress as it goes.Then run it again. Then a third time.
Open the three resulting api_output.csv files (or save each as api_output_run1.csv, _run2.csv, _run3.csv). They will not be identical. Some sentences will get the same answer all three times. Others will not.
This is the non-deterministic half of the lesson. The model gave a different output for the same input. Nothing changed except time. If you want to publish results from this pipeline, you need to capture which run produced them — and ideally run many times and aggregate.
Compare the outputs across three approaches
The same 20-sentence corpus, three ways: the regex script, Qwen3.5 0.8B (what you ran in class), and — for comparison — Qwen3.5 9B (which we ran beforehand, to show what changes when the model gets bigger). The numbers below are from the workshop trial runs; you should see the same shape in your own class data, give or take run-to-run variation.
Ask Codex:
Open regex_output.csv and api_output.csv side by side. Where do the two methods agree? Where does each one win? Where do both fail?| Regex (deterministic) | Qwen 0.8B (3 runs) | Qwen 9B (3 runs) | |
|---|---|---|---|
| Non-determinism (sentences whose answer changed across 3 runs) | 0% — identical every run | 45% (9/20) | 5% (1/20) |
| Hallucinations across 60 sentence-runs | 0 | 0 | 1 (added 禹 to sentence 16 in run 2 — a near-hallucination from the geographic phrase 禹河/禹迹) |
| Sentences answered perfectly (right names, no extras) | ~30% (6/20) | ~45% (avg across runs) | ~95% (19/20) |
| False positives per run | Many — every “baijiaxing surname + 1–2 chars” sequence | ~0 | ~0 (except the one 禹 above) |
| Out-of-dictionary names (e.g. 濑尾澄江 in #8) | Cannot catch — no baijiaxing prefix | Caught 2/3 runs | Caught 3/3 runs |
| Names “trapped” by the greedy regex (e.g. 范百禄 in #16, 贾鲁 in #17) | Never caught — regex consumes them | 范百禄 caught 2/3, 贾鲁 never caught | Both caught 3/3 runs |
| Famous names regex catches but small LLM mysteriously misses | n/a | 朱熹 missed all 6 runs (#18, #20); 顾炎武 missed 3/3 (#11) | All caught |
| Speed per sentence | Instant | ~1 second | ~5–10 seconds |
| Memory footprint | Negligible | ~1.7 GB | ~18 GB |
Sample-size honesty. Three runs of 20 sentences are too few to publish from. The point is for students to see the shape: regex 100% deterministic / 0.8B ~55% deterministic / 9B ~95% deterministic. Real research-grade evaluation would run hundreds of times against a held-out gold standard.
Three teaching observations from the runs
More parameters help dramatically — but reproducibility is never free. The 9B caught essentially every name in the corpus and was nearly identical across runs. But it still varied on one sentence out of twenty — and the variation was a hallucinated extra (禹 in sentence 16, run 2). The reproducibility floor for an LLM is not zero non-determinism; it just gets lower with size and cost.
A small model is not always better than no model. The 0.8B consistently missed names that the regex caught every run. 朱熹 — one of the most famous names in Chinese history — was missed in all six 0.8B runs across sentences 18 and 20, while the regex caught it (as
朱熹的) every time. If your job is to extract names, throwing a tiny LLM at the problem can be worse than a regex and harder to audit.Regex and LLM failures have different shapes. Regex fails structurally: 范百禄 can never be recovered because 时 consumed 范 before the script ever tried, and the script cannot back up. The 0.8B fails stochastically and oddly: it misses famous names and gives up on long sentences. The 9B fails rarely but creatively: a single hallucinated 禹 from a geographic phrase. Different failure shapes mean different methods can cover each other — which is exactly the script-vs-LLM-hybrid pattern.
Mapping back to the Four Pillars
| Approach 1 (regex) | Approach 2 (0.8B API) | Approach 2 (9B API) | |
|---|---|---|---|
| Models | (none — no LLM involved) | Qwen3.5 0.8B | Qwen3.5 9B |
| Prompts | (the regex pattern itself) | System prompt + user prompt | Same |
| Context | The baijiaxing dictionary | The sentence | Same |
| Tools | The Python interpreter | The OpenAI-compatible chat-completions endpoint | Same |
The Models pillar is now visible as a slider, not a binary. Three positions on the same axis — no model / tiny model / bigger model — give three different reliability profiles. Choosing where on the slider to sit is itself a research design decision.
When to use which
- Use the deterministic approach when you can write down what you are looking for as a rule: citations in a fixed style, dates in
YYYY-MM-DD, sequences with a known prefix. Predictable failures you can correct for. - Use a small LLM when you need some flexibility, have downstream validation, and are willing to log every run. Be skeptical: the small model may quietly miss obvious cases.
- Use a bigger LLM when you want high recall and can pay the time / memory / electricity cost. Verify the residual hallucinations are not material to your research question.
- Use multiple methods together when you can. The regex pass cheaply finds the easy cases. The LLM picks up what rules miss. Where the two disagree, a human reads. This is the script-vs-LLM-hybrid pattern that the rest of the workshop returns to repeatedly.
Summary — what you should take away
- Deterministic vs non-deterministic is the right diagnostic question. Ask it before you reach for an LLM. Half the time a regex or a SQL query is genuinely the better tool.
- The cost of non-determinism is reproducibility. Published research that depends on an LLM has a problem your reader will not have to think about with a deterministic pipeline.
- System prompt vs user prompt is the smallest useful prompt-engineering distinction. Set the what to do in the system prompt, leave the what to do it on in the user prompt. Your prompts get shorter, your model gets more consistent, and your code becomes a clean loop.
- An API is just JSON in, JSON out, over HTTP. Once you have seen one
curlagainst the chat-completions endpoint, every cloud API is a variation on the same shape. - Read code you didn’t write. A real research skill. Codex makes it easier — ask it to explain any line you don’t understand.
Closing — homework before Day 2
Day 2 morning we will build your personal website and push it to GitHub Pages. For that you need Git and the GitHub CLI installed, and your Git commit identity (name + email) set up properly — otherwise every commit you push to a public repo will permanently expose your personal email address.
A quick account check plus three short Codex tasks tonight, on your hotel Wi-Fi (not the conference Wi-Fi).
Task 0 — Create a GitHub account (if you don’t already have one)
Skip this task if you already have a GitHub account. Sign in to https://github.com in your browser to confirm.
If you don’t yet have one:
- Go to https://github.com/signup.
- Use an email you check regularly. (This is the public email on your account — it does not have to be the one Git stamps into commits; we’ll set up a privacy-preserving noreply alias for that in Task 2.)
- Pick a username you would not mind appearing in a citation —
firstname-lastname, an academic handle, or your existing scholarly handle. It is hard to change later without breaking links to anything you publish. - Confirm the email and finish onboarding. GitHub Free is enough for everything we do this week.
You’ll need to be signed in for the gh auth login step in Task 1.
Task 1 — Install Git and the GitHub CLI
Open Codex Desktop and send:
Check if Git and GitHub CLI (gh) are installed on this machine. If either is missing, install them using the appropriate package manager for my OS (Homebrew on macOS, winget on Windows). After install, verify both are working by running `git --version` and `gh --version`. Then run `gh auth login` so I can authenticate with my GitHub account.On macOS the first git command can trigger an Xcode Command Line Tools install dialog — a ~20-minute one-time download. Do it tonight, not tomorrow morning in class. If something goes wrong, arrive 15 minutes early on Day 2 and a TA will get you sorted before the first session.
Task 2 — Set your Git identity and turn on email privacy
Every Git commit is stamped with a name (user.name) and an email (user.email) you choose. Both get permanently baked into commit history — including in public GitHub repos, where they are visible to anyone (and to email-harvesting bots) until the repo is deleted.
The fix is GitHub’s noreply email — a privacy address of the form ID+USERNAME@users.noreply.github.com that Git accepts but reveals nothing personal. The setup has four moving parts: pick a name, find your noreply email on GitHub, write both into git config, and turn on a safety net that blocks accidental leaks.

git config in step 4 below. Your version will have a different numeric ID and your own GitHub username — the format is always ID+USERNAME@users.noreply.github.com.After Task 1 finishes, send Codex:
Help me configure Git and set up commit email privacy:

1. Set my Git username with `git config --global user.name "..."`. Ask me what name I want to use (this is the name that appears on every commit — my real name or a chosen pen name).
2. Show me my current commit email with `git config --global user.email`.
3. Walk me through going to https://github.com/settings/emails to enable BOTH "Keep my email addresses private" AND "Block command line pushes that expose my email".
4. Have me copy my noreply email (it appears under the first checkbox after I enable it; format: ID+USERNAME@users.noreply.github.com), then update my local config with `git config --global user.email "..."`.
5. Verify by printing both `git config --global user.name` and `git config --global user.email` back to me.The Codex prompt above automates these four steps. You can run them by hand if you’d rather see each command:
# 1. Pick a name (the name that appears on every commit).
git config --global user.name "Your Full Name"

# 2. Get your noreply email from https://github.com/settings/emails:
#      - Check "Keep my email addresses private"
#      - Check "Block command line pushes that expose my email"
#      - The noreply email appears under the first checkbox. Copy it.

# 3. Paste the noreply email here:
git config --global user.email "ID+USERNAME@users.noreply.github.com"

# 4. Verify both:
git config --global user.name
git config --global user.email
Task 3 — Check what you ended up with
The last step before bed: confirm everything is wired correctly. Open the terminal pane in Codex Desktop (⌘J) and run these two lines yourself:
git config --global user.name
git config --global user.email
You should see the name you chose and an email ending in @users.noreply.github.com. If either is wrong or missing, redo Task 2.
Reminder for tomorrow. Before your first commit on Day 2, run those same two commands one more time to double-check. Git embeds whatever user.name and user.email say at the moment of the commit, and the result is permanent — there is no “undo” if a commit goes out with your personal email attached, only “delete and recommit.” Five seconds of verification saves hours of cleanup.
We did not push anything to GitHub today. Installing Git is tonight’s homework (Tasks 1–3 above); pushing to GitHub happens tomorrow morning. Day 1 ended on a concept (deterministic vs non-deterministic), not a deploy.
References
- Python
remodule documentation - Hundred Family Surnames (百家姓) on Wikipedia
- LM Studio Developer / Local Server docs
- OpenAI Chat Completions API reference — the format LM Studio mimics.
- Pattern: Script vs LLM Hybrid — see the curriculum wiki’s
patterns/script-vs-llm-hybrid.md.