flowchart TB
subgraph laptop["YOUR LAPTOP"]
codex["<b>Codex Desktop</b><br/>the agent you talk to<br/>chat · editor · terminal"]
tool["<b>Your HTML tool /<br/>Python script</b><br/>makes API calls"]
lms["<b>LM Studio</b><br/>local model runtime<br/>Qwen 0.8B · API on :1234"]
end
gpt["<b>OpenAI GPT-5.5 API</b><br/>Codex's brain<br/>(in the cloud)"]
google["<b>Google AI Studio</b><br/>Gemini models<br/>(in the cloud)"]
openrouter["<b>OpenRouter API</b><br/>cloud model marketplace<br/>(in the cloud)"]
codex ==>|"every chat turn"| gpt
codex -.->|"writes & runs"| tool
tool -->|"local fetch (Parts A, C)"| lms
tool -->|"cloud fetch (Part D)"| google
tool -->|"cloud fetch (Part D)"| openrouter
Day 2 opening — finish the API loop, install Git, ship one tool three times
From one curl call to a public web tool that grows feature by feature — 2026 DCI Summer Workshop, Day 2 Session 1
Today’s session
We ran out of time at the end of Day 1. The plan today:
Finish what we started with the LM Studio API — three endpoints, CORS, one clean curl call that works on every operating system, then run the Python script that scales it.
Install Git and the GitHub CLI — so we can publish.
Build one HTML LLM tool, three times. Each round adds one capability and re-ships:
Stage What the tool can do Backend(s) Deploy C — one function Batch-process a text/CSV file through an LLM LM Studio only First push D — two functions Same tool, also calls cloud OpenAI-compatible providers LM Studio · Google AI Studio · OpenRouter Second push E — three functions Same tool, also accepts image files for OCR / vision Any backend with a vision model Third push
By the end of the session your tool is live on the public web at https://YOUR-USERNAME.github.io/batch-llm-caller/, has been through the edit → commit → push → deploy loop three times, and demonstrates how real research tooling grows — from a minimum-viable version to a multi-feature app — through small, shippable iterations.
Note
Teaching goal. Not “learn HTML/CSS/JavaScript” — those are years of study. Learn the shape of a research tool that calls an LLM backend, why a single self-contained HTML file is the right deliverable for humanities research, and how the edit → commit → push → deploy loop turns iterative tinkering into a versioned, shareable artifact. By the third deploy the loop is muscle memory.
TipSession materials
Download session_05_materials.zip — everything below in one bundle.
Or grab individual files:
sample-sentences.txt— sample Chinese sentences for the text batch toolbody.json— the curl request body for Part A (saved as a separate file so the same command works on every OS)nlvnpf-0100-001.jpg— sample image for the OCR stage in Part E (a page from a Vietnamese manuscript in classical Han script)README.md— what’s in the folder
Part A — Finish yesterday’s API loop
30-second recap
Yesterday afternoon you saw two ways to extract personal names from Chinese sentences. The regex approach was 100% reproducible but blind to meaning. The LM Studio API approach was smarter but non-deterministic — same input, different output across runs. We got as far as one curl call. Today we finish: we look at where that curl call points, why it works the way it does, and then we run the Python script that scales the same logic to a whole corpus.
We also have one Day 1 bug to fix: the curl command in the notes used line-continuation backslashes and inline single-quoted JSON, which is a Mac/Linux convention that breaks on Windows. Today’s version uses a JSON file, which works identically everywhere.
Three apps, three roles
A common question from Day 1 was: “There’s LM Studio open, and Codex open, and now we’re going to add OpenRouter — what is each of these doing, and how are they connected?”
Read this diagram once and the rest of today snaps into place:
- Codex Desktop is the agent you talk to. Its brain is OpenAI’s GPT-5.5, which lives in OpenAI’s cloud. Every message you type goes to GPT-5.5 and the model’s reply comes back. Codex never talks to LM Studio, Google AI Studio, or OpenRouter directly.
- LM Studio is a separate program that runs a local model (Qwen 0.8B) and exposes an API server on
http://localhost:1234. It is not part of Codex. It does not know Codex exists. - Google AI Studio is a cloud service at
https://generativelanguage.googleapis.comthat exposes Google’s Gemini models — including a freegemini-2.5-flashtier — through an OpenAI-compatible endpoint. - OpenRouter is a cloud marketplace at
https://openrouter.aithat proxies hundreds of models from dozens of providers, also through an OpenAI-compatible API. - Your HTML tool (or Python script) is the thing that talks to any of those three. Codex’s role is to write that tool and run it — but once the tool is built, it’s the tool making the API calls, not Codex.
The one sentence to memorize: Codex writes the tool; the tool talks to the model.
Three API “styles” and three endpoints
LM Studio is unusual in exposing three different wire formats for the same loaded model — three different ways of structuring the JSON request and response. You see them as three tabs in LM Studio’s Developer panel under “Supported endpoints”:
| Tab | What it is | When you use it |
|---|---|---|
| LM Studio API | LM Studio’s own native format | Tied to LM Studio. Useful for LM-Studio-specific features. |
| OpenAI-compatible | Identical wire format to OpenAI’s API | The default we use. Any code written for OpenAI just works. OpenRouter speaks this format too, and so does Google AI Studio’s OpenAI-compatible endpoint — which is exactly why our tool will work against all three backends. |
| Anthropic-compatible | Identical wire format to Claude’s API | For code written against Anthropic’s SDK. |
The same loaded model serves all three formats simultaneously. You pick whichever your client knows how to speak.
Under the OpenAI-compatible tab you see three endpoints:
| Endpoint | What it returns | Why it exists |
|---|---|---|
GET /v1/models |
A JSON list of loaded models with their IDs | How a client discovers what models are available. Useful when you don’t know what to put in "model": "...". |
POST /v1/chat/completions |
An assistant reply to a list of {role, content} messages |
The classic OpenAI chat format. Released 2023; still the default in 90% of tutorials and existing code. Our tool uses this one. |
POST /v1/responses |
A more structured response with built-in tool, file, and stateful-conversation support | The newer OpenAI Responses API (introduced 2025). Functionally a successor to chat/completions, but adoption is still partial. |
For this workshop you only need /v1/chat/completions. It is the format every cloud LLM provider speaks one way or another, and it is what every script and tool we build today targets.
CORS — and why we need to turn it on now
Open LM Studio → Developer tab → Server Settings (the gear icon next to the Status toggle). One toggle matters today: Enable CORS.
CORS stands for Cross-Origin Resource Sharing. It is a browser security rule: a JavaScript app loaded from one website cannot make HTTP requests to a different one unless the target server explicitly permits it (by sending the right HTTP headers).
- CORS off (yesterday’s setting, the default): a web page running in your browser cannot call
http://localhost:1234. Python scripts,curl, and Codex are unaffected — they are not browsers and they do not enforce CORS. - CORS on: LM Studio adds the headers a browser needs to permit the call. Required when a web page is calling LM Studio.
Turn it on now. Parts C, D, and E of today’s session all build HTML — web pages — that call LM Studio. Without CORS on, the pages will fail with Access to fetch at 'http://localhost:1234/...' has been blocked by CORS policy.
Warning
Toggle CORS off again when you finish today. Turning CORS on means any web page you happen to visit in your browser can also call your local model. For long-running local LLM use, leave it off; toggle on only when you are actively running a browser frontend.
Redo the curl call — Windows-safe
The version in yesterday’s notes used \ line continuations and inline single-quoted JSON. Those are Mac/Linux conventions that break on Windows cmd and PowerShell. Today’s version saves the body to a file and uses -d @body.json, which works identically on every shell on every OS.
In your materials/ folder you should already have body.json. Open it with Codex:
Open materials/body.json and show me its contents. Also tell me what each field does.It looks like this:
{
  "model": "qwen3.5-0.8b",
  "messages": [
    {"role": "system", "content": "你是一个中文命名实体识别工具。给定一个中文句子,请只输出其中出现的人名,以 JSON 数组格式回应。如果没有人名,回应 []。不要解释,不要加其他内容。"},
    {"role": "user", "content": "王小明今天去了北京大学。"}
  ],
  "temperature": 0.7
}
ImportantThe model field is not a placeholder
The "model" field must match exactly what LM Studio’s Developer tab shows on the right side as the loaded model’s identifier (e.g., qwen3.5-0.8b, qwen3.5-0.8b-instruct, qwen3.5-0.8b-mlx-4bit). It’s whatever your local install named the file when you downloaded it.
If it doesn’t match, LM Studio returns a “model not found” error. Two students hit this yesterday with request bodies that left it blank — LM Studio’s blank-string fallback to the loaded model does not always fire across versions. Always put the real identifier in.
Now open the terminal pane in Codex Desktop (⌘J on macOS, Ctrl+J on Windows). Make sure you are in the materials/ folder of wherever you unzipped session_05_materials.zip — e.g. cd ~/Downloads/session_05_materials/materials (on Windows, cd "$HOME\Downloads\session_05_materials\materials"). Then run this single line:
curl -X POST http://localhost:1234/v1/chat/completions -H "Content-Type: application/json" -d @body.jsonYou should get back a JSON object. Inside choices[0].message.content you will find the model’s answer — something like ["王小明"].
Note
One line — no continuations. \ line continuations (the Mac/Linux convention) break on Windows cmd and PowerShell, and ^ / backtick continuations break elsewhere. The portable answer is to keep curl on one line, even when that line is wide. Combined with -d @body.json (which reads the body from a file and dodges all the inline-JSON quoting headaches), this single command works identically in macOS Terminal, Windows cmd, PowerShell 7+, and Git Bash. One Windows caveat: in Windows PowerShell 5.1 (still the default on many machines) curl is an alias for Invoke-WebRequest, so type curl.exe instead of curl.
Run the curl command twice. Compare the responses. They may differ — sometimes subtly (the model returns ["王小明"] once and [ "王小明" ] the next), sometimes substantively (one run hallucinates an extra name). This is non-determinism made visible.
Step 2c — the same logic, scaled
Open extract_names_api.py from yesterday’s session 04 materials. (If you don’t still have it open, it lives at ~/genai-workshop/session-04/materials/extract_names_api.py.) Ask Codex:
Open extract_names_api.py and explain what it does. In particular, show me where it sends the system prompt vs the user prompt, and where it loops through sentences.Codex will point out three things:
- The system prompt is loaded once, from
system_prompt.txt. - For every sentence, a new request is built with that fixed system prompt and the sentence as the user prompt.
- The response is parsed as JSON and written to
api_output.csv.
This is exactly the same logic as your one curl call — just looped 20 times over the corpus.
Now run it:
Run extract_names_api.py from yesterday's materials folder. Make sure LM Studio's local server is running on http://localhost:1234. Show me the printed progress as it goes.Then run it again. Then a third time. The script overwrites api_output.csv on each run, so rename the file between runs (api_output_run1.csv, _run2.csv, _run3.csv).
Open the three resulting CSV files. They will not be identical. Some sentences will get the same answer all three times. Others will not.
Important
This is the non-deterministic half of yesterday’s lesson. The model gave a different output for the same input. Nothing changed except time. If you want to publish results from this pipeline, you need to capture which run produced them — and ideally run many times and aggregate. The regex pipeline did not have this problem; that is what determinism buys you.
The three-way numerical comparison (regex / Qwen 0.8B / Qwen 9B across three runs each) is in yesterday’s notes if you want the detail. The 30-second shape is: regex 100% reproducible, 0.8B ~55% reproducible, 9B ~95%. More parameters help, but reproducibility is never free.
Part B — Install Git and the GitHub CLI
Why install now
In Parts C, D, and E we are going to publish an HTML tool you build to the public web, using GitHub Pages, and re-ship it twice more as we add features. That requires two command-line tools: git (the version control system itself) and gh (GitHub’s official CLI, which lets us create the repo and push it in one command without leaving the terminal).
Last night’s email asked you to create a GitHub account and an OpenRouter account. We are installing git and gh together, in class, now.
If git --version and gh --version both return numbers when you type them, skip ahead to Part C — you already have them.
Mac install
The recommended path in 2026 is Homebrew. The standalone .pkg installer that older tutorials reference is no longer maintained (the last one was built in 2021 and git-scm.com no longer links to it).
# If you already have Homebrew:
brew install git gh

# If you do not have Homebrew, install it first
# (one-line installer from https://brew.sh):
/bin/bash -c "$(curl -fsSL https://raw.githubusercontent.com/Homebrew/install/HEAD/install.sh)"
# Then:
brew install git gh
The Homebrew installer will itself trigger the Xcode Command Line Tools download (a one-time ~1.5 GB) — let it. Total time: about 15 minutes on hotel Wi-Fi.
WarningTahoe 26.1 trap
Apple has a confirmed bug on macOS Tahoe 26.1 specifically: xcode-select --install fails with “can’t install the software because it is not currently available from the software update server.” Last night’s email asked you to update from 26.1 if you were on it.
To check your version: Apple menu → About This Mac. If the macOS line says Tahoe 26.1, update now: System Settings → General → Software Update. Tell a TA and continue with the rest of us — the install can run in the background once the update finishes.
Tahoe 26.2 and higher (including the current 26.5) are fine. So are Sequoia 15 and Sonoma 14. Older macOS works too, but Homebrew may need to build from source instead of using a pre-built bottle — slower but functional.
If you specifically want to avoid Homebrew (some prefer this), you can install Apple’s Xcode Command Line Tools alone:
xcode-select --installThat gives you git but not gh. You will need to install gh separately later from https://cli.github.com.
Windows install
Download the .exe from https://git-scm.com/install/windows. The current build is Git for Windows 2.54.0. Double-click and walk through the installer. Most screens you can accept the default. Three matter:
| Installer screen | What to pick | Why |
|---|---|---|
| Default editor | Visual Studio Code (if installed), otherwise Notepad++ or your system default | The default is Vim, which traps first-timers in a modal editor. Avoid. |
| PATH environment | “Git from the command line and also from 3rd-party software” (the middle option) | Lets cmd, PowerShell, and Codex all find git. |
| Line endings | “Checkout as-is, commit Unix-style line endings” | Avoids the CRLF/LF wars when your files end up on a Mac/Linux server. |
After Git for Windows finishes, install gh separately:
winget install --id GitHub.cli(Or download the .msi from https://cli.github.com if you prefer.)
TipOne-line install for confident Windows users
If you are comfortable with winget and want both at once:
winget install --id Git.Git -e --source winget
winget install --id GitHub.cli
You can configure Git afterward via git config --global ... (see “Set your Git identity” below).
Verify
In a fresh Codex Desktop terminal pane (or a regular Terminal / Command Prompt), run both:
git --version
gh --version
You should see two version numbers — e.g., git version 2.54.0 and gh version 2.x.x. If either says “command not found” / “is not recognized,” ask Codex:
`git --version` returns "command not found" on my system. I just ran the Homebrew/Windows installer. Help me diagnose why git is not on the PATH.A TA can also help — raise your hand. We continue once everyone is at two version numbers.
Authenticate with gh auth login
gh auth loginPick GitHub.com → HTTPS → Login with a web browser. A one-time code appears in the terminal; gh opens your browser; you paste the code and approve. The terminal confirms Logged in as YOUR-USERNAME.
This is the same GitHub account you created last night.
Set your Git identity (with email privacy)
Every Git commit is stamped with a name (user.name) and an email (user.email) you choose. Both get permanently baked into commit history — including in public GitHub repos, where they are visible to anyone (and to email-harvesting bots) until the repo is deleted.
The fix is GitHub’s noreply email — a privacy address of the form ID+USERNAME@users.noreply.github.com that Git accepts but reveals nothing personal.
In your browser:
- Sign in to GitHub. Go to https://github.com/settings/emails.
- Check “Keep my email addresses private”.
- Check “Block command line pushes that expose my email”.
- Copy the noreply email that appears under the first checkbox. Format:
ID+USERNAME@users.noreply.github.com.
In Codex Desktop’s terminal:
git config --global user.name "Your Full Name"
git config --global user.email "ID+USERNAME@users.noreply.github.com"

# Verify:
git config --global user.name
git config --global user.email
The email line must end in @users.noreply.github.com. If it shows your personal email, redo the step above.
Important
This is permanent. Git embeds whatever user.name and user.email say at the moment of the commit. If a commit goes out with your personal email attached, the only way to remove it is to delete the repo (or rewrite history, which is non-trivial). Five seconds of verification now saves hours of cleanup later.
Part C — Stage 1: ship a simple LM Studio tool
This is the minimum-viable version. One backend (your local LM Studio), one input type (text/CSV files). Build it, test it, get it onto the public web. Stage 2 and Stage 3 will add features to this exact same file.
What we are building
A web page (one file, index.html) with:
- A text area for a system prompt — “you are a Chinese NER tool”, “you are a 19th-century telegraphy expert”, whatever.
- A file picker that accepts a
.txtor.csvof prompts, one per line. - A Run button.
- A status display showing progress as the tool loops through each line and calls the LLM.
- A download button that hands you back the results as a CSV.
The user picks a file → presses Run → sees progress → downloads results. No installation, no terminal, no Python, no command line. A colleague who has never written a line of code can use this tool, given only the file and a running LM Studio.
Set up the project folder
Every project you build in this workshop will live in one shared parent folder under your home directory:
~/genai-workshop/(~ is shorthand for your home folder: /Users/YOUR-USERNAME on macOS, C:\Users\YOUR-USERNAME on Windows.)
Today’s tool goes in a fresh subfolder of that parent:
~/genai-workshop/batch-llm-caller/
WarningWhy not under Documents or Desktop?
Do not put workshop projects in ~/Documents/ or ~/Desktop/. Both folders are usually synced to a cloud service by default — iCloud Drive on macOS, OneDrive on Windows (if you signed in with a Microsoft account). Two things go wrong when a Git project is inside a synced folder:
- Sync conflicts during git operations. The cloud service can rewrite, lock, or “offload” files mid-commit. You will see strange errors like
fatal: unable to write new index fileor files disappearing fromgit status. - Slow file operations. Every
git add, everynpm install, every save round-trips through the sync service.
A plain folder directly under your home directory (~/genai-workshop/) is not touched by either sync service. Use it for every workshop project this week.
Create the folder and open it as a Codex project
The cleanest path: create the folder with one terminal command, then point Codex Desktop at it.
Step 1 — open a terminal. In Codex Desktop, press ⌘J (macOS) or Ctrl+J (Windows) to open the terminal pane. Or open Terminal.app / Windows Terminal directly — either works.
Step 2 — create the folder:
mkdir -p ~/genai-workshop/batch-llm-callermkdir -p creates the parent genai-workshop folder too if it doesn’t already exist, and silently succeeds if it does. Safe to run repeatedly. (On Windows: PowerShell users run mkdir "$HOME\genai-workshop\batch-llm-caller" — PowerShell creates parent folders by default and needs no -p; cmd users should use the full path, e.g. mkdir %USERPROFILE%\genai-workshop\batch-llm-caller, since cmd does not expand ~.)
Step 3 — open it as a project in Codex Desktop:
- In Codex Desktop, click the Projects icon (left sidebar) → + (or the New project / Add project button — the exact label depends on your Codex version).
- Choose Open existing folder (sometimes labelled Use an existing folder or Open folder…).
- In the file dialog, navigate to your home directory →
genai-workshop→batch-llm-caller. Click Open.
Codex Desktop now treats batch-llm-caller/ as a project: the chat panel, the file editor, and the terminal pane all operate inside that folder.
TipConfirm you are in the right place
After opening the project, type this in the Codex terminal:
pwdYou should see something like /Users/YOUR-USERNAME/genai-workshop/batch-llm-caller (macOS) or C:\Users\YOUR-USERNAME\genai-workshop\batch-llm-caller (Windows). If it says anything containing Documents, Desktop, OneDrive, or iCloud, close the project and redo Step 3 — pick the right folder.
By the end of Part C this folder contains a single file: index.html — the tool itself. Later, in the Codex-Git appendix, you will optionally add an AGENTS.md (Codex’s per-project instructions) to shape how the agent commits on your behalf.
Also locate materials/sample-sentences.txt from this session — a 10-line subset of yesterday’s corpus. Either drag it into your batch-llm-caller/ folder or remember its path; you’ll point the file picker at it later.
Confirm CORS is on
You already turned it on in Part A. Quick check: LM Studio → Developer tab → Server Settings → Enable CORS is toggled on. If not, toggle it now.
Build the tool — one description, one Codex turn
We could try to build this tool piece by piece. We won’t, because iterating Codex on the same file across multiple turns is a known failure mode: each turn only sees the current file plus the new prompt, and earlier work can get silently rewritten. Better: describe the whole tool once, in plain English, and let Codex deliver it in one turn.
Send Codex this prompt:
Build me a single self-contained HTML file called index.html in this folder. It is a "batch LLM caller" tool: users pick a text or CSV file (one prompt per line), paste a system prompt, and the tool sends each line to the LM Studio OpenAI-compatible chat-completions API and lets them download the results as a CSV.

What the user sees on the page:
- Heading "LLM batch caller".
- A textarea for the system prompt.
- A file picker accepting .txt and .csv (one prompt per line).
- An input for the model name — default qwen3.5-0.8b.
- A "Run" button.
- A status area showing progress as each line is processed.
- A results area showing each input alongside its model response.
- A "Download CSV" button that appears after all lines are processed and downloads results.csv with columns row_number, input, response.

The tool calls http://localhost:1234/v1/chat/completions (LM Studio's OpenAI-compatible endpoint). No authentication header — LM Studio does not require one.

Constraints:
- Single file: HTML + inline CSS + inline JavaScript. No build step. No external dependencies. No <script src="..."> pointing to CDNs.
- Use only standard browser APIs: FileReader for the file, fetch for the API call, Blob for the download.
- Properly escape CSV fields that contain commas, quotes, or newlines.
- Style it clean and readable: max-width about 720px, centered, system font stack, generous spacing between fields.
- If a request fails, store the error message as the "response" for that line and continue with the next line — don't stop the whole batch.
Approve Codex’s edits. The file should be ~100 lines of HTML + CSS + JavaScript, all in one place.
TipWhy one prompt instead of four
This is a deliberate teaching choice. Building Codex tools in many small steps feels safer — “if I tell it one thing at a time, surely it can’t mess up” — but the opposite is true on a single growing file. Each Codex turn rewrites parts of the file from scratch and can quietly drop earlier work. A complete description in one turn keeps everything coherent.
Reserve incremental edits for fixes and clearly-scoped extensions (“the status area doesn’t update”, “add two input fields for the API URL and key”), not for piecemeal building. Stages D and E below are exactly this kind of well-scoped extension.
Read what Codex built
Before clicking Run, take five minutes to understand what Codex built. In the same Codex thread, ask:
Walk me through index.html section by section. What does each part do? In particular: where does the file get read, where does the API call happen, and where does the CSV get built and downloaded?Codex will narrate its own file. Read along. You don’t need to follow every line — but you should recognize the four main blocks:
- The HTML form — the textareas, inputs, button you see on the page.
- The file reader — JavaScript that turns the picked file into an array of lines.
- The fetch loop — JavaScript that POSTs each line to the API and stores the response.
- The CSV download — JavaScript that turns the result array into a downloadable file.
If anything is unclear, ask Codex: “explain the fetch loop in plain English”, “what does Blob do”, etc. This is the central skill of agentic engineering: not writing code, but recognizing whether the agent’s code is what you wanted.
Test it against LM Studio
Open index.html by double-clicking it in Finder / Explorer. Your browser opens the page. Paste this into the System prompt textarea (same NER prompt from session 04):
你是一个中文命名实体识别工具。给定一个中文句子,请只输出其中出现的人名,以 JSON 数组格式回应。如果没有人名,回应 []。不要解释,不要加其他内容。Pick materials/sample-sentences.txt. Press Run.
You should see:
- Status updates marching from
Processing 1 / 10toProcessing 10 / 10. - Results appearing in the results area: each input sentence next to Qwen’s JSON reply.
- A Download CSV button appearing after the tenth line.
Click Download CSV. Open results.csv in Numbers / Excel / a text editor. Three columns: row_number, input, response.
Important
Congratulations — you have just built a working LLM batch tool in a browser. It is doing exactly what yesterday’s extract_names_api.py did. The visible difference is the user experience (a file picker, a button, a progress display, no terminal). The invisible difference is who can use it: anyone with a browser.
When something doesn’t work — iterate, but for fixes only
If the tool misbehaves (status counter stuck, CSV columns wrong, weird error in the browser console), open the browser’s developer tools (right-click → Inspect → Console) and read the error. Then come back to Codex with a specific fix request:
The tool currently <describe the symptom>. The browser console shows <paste the error message>. Please fix it.That is the right shape for an incremental Codex turn: “here is exactly what is wrong, please fix it.” Not “add a feature, then another, then another” — which is how state gets lost.
Initialize Git, commit, and push to GitHub (first deploy)
You have a working tool. Right now it lives in one folder on your laptop. Time to put it under version control and publish it.
The four phases of Git
Every file in a Git repository lives in one of four locations:
flowchart LR
    A["Working directory\n(your files)"] -->|"git add"| B["Staging area\n(prepared)"]
    B -->|"git commit"| C["Local repository\n(history on this machine)"]
    C -->|"git push"| D["Remote repository\n(GitHub)"]
    D -->|"git pull / clone"| A
| Phase | What it is | The command that moves it forward |
|---|---|---|
| Working directory | The actual files on disk you’re editing | (just save normally) |
| Staging area | Files you’ve marked as “include in the next commit” | git add <file> |
| Local repository | The history saved inside the hidden .git/ folder |
git commit -m "msg" |
| Remote repository | The history on GitHub | git push |
A commit is a snapshot of all staged changes, with a message. Every commit has a unique ID and a parent. The whole history is a tree.
Initialize the repository
In the terminal pane, navigate to your tool folder and initialize Git:
cd ~/genai-workshop/batch-llm-caller
git init
git status
git status should show index.html as an untracked file. That is “working directory only” — Git knows the file exists but is not yet watching it.
WarningOne last identity check
Before the first commit:
git config --global user.name
git config --global user.email
The email must end in @users.noreply.github.com. You set this up in Part B; this is the final check before the values get permanently embedded in your commit history.
Stage and commit
git add -A
git commit -m "Stage 1: batch LLM caller against local LM Studio"
git log
git log shows one commit — your first. The author email next to your name should be the noreply one.
Push to GitHub
Create the GitHub repository and push, in one command:
gh repo create batch-llm-caller --public --source=. --pushThat single command:
- creates a public repo called
batch-llm-calleron your GitHub account; - sets your local repo’s remote to the new GitHub repo;
- pushes the commit.
Visit https://github.com in your browser — your repo is at https://github.com/YOUR-USERNAME/batch-llm-caller. The index.html is browsable directly on GitHub.
Note
Why public? Free hosting on GitHub Pages requires the repo to be public. If your tool contained an API key, private data, or anything sensitive, do not push — keep it local or use a different host. Stage 1’s tool only knows the LM Studio URL and a model name; there is nothing sensitive in the source.
Turn on GitHub Pages
In your browser:
- Go to
https://github.com/YOUR-USERNAME/batch-llm-caller/settings/pages. - Under Source, choose Deploy from a branch.
- Under Branch, pick
main/(root)and click Save.
Within about 60 seconds your tool’s source is live at:
https://YOUR-USERNAME.github.io/batch-llm-caller/Test the deployed page
Open the URL above. Press Run on the deployed page (same NER system prompt, same sample-sentences.txt, default model). It should work. Same status counter, same results, same Download CSV.
This may feel surprising — an HTTPS page is talking to http://localhost:1234. Wouldn’t browsers normally block that as “mixed content”?
No — and the reason matters. Modern browsers treat http://localhost, 127.0.0.1, and [::1] as potentially trustworthy origins under the W3C Secure Contexts spec. Loopback addresses are explicitly excepted from the mixed-content rule, because the bytes never leave your machine. So an HTTPS page on github.io is allowed to fetch http://localhost:1234 — provided CORS is enabled on the server, which you turned on in Part A. (CORS is a separate rule; it must also pass.)
Two implications worth pinning down:
- The deployed URL is a real, working tool, not just a source archive. A colleague visiting
https://YOUR-USERNAME.github.io/batch-llm-caller/who is also running LM Studio with CORS on gets the same experience you do — they upload their file, the tool calls theirlocalhost, results come back, CSV downloads. Their data never reaches your machine; nor reaches the GitHub Pages server. Each visitor’s browser talks to each visitor’s local LM Studio. - The cloud hosts your code; your machine hosts your data and your model. This is the local-first, cloud-second pattern in its cleanest form. Sharing a research tool no longer means standing up a backend, paying for hosting, or worrying about API keys. Push to GitHub Pages, send the URL.
WarningTwo things still need to be true on the visitor’s side
The visitor must (a) have LM Studio running locally with a model loaded, and (b) have the CORS toggle on in LM Studio’s Server Settings. Without those, the fetch will fail.
Also: test the deployed page in Chrome, Edge, or Firefox. Safari does not treat http://localhost as a trustworthy origin for mixed content, so the HTTPS-page-to-localhost fetch fails there — a long-standing WebKit limitation, not a bug in your tool.
Finally: Chrome 142 and later show an explicit Local Network Access permission prompt — a one-time “allow this site to talk to local devices?” dialog. If a visitor sees that prompt, they click Allow once and the tool then works. Other browsers may follow.
TipStage 1 complete
You have shipped a working LLM tool to the public internet. One commit, one push, one Pages deploy. The next two stages add capabilities to this same file, and re-ship.
Part D — Stage 2: add cloud-API support (Google AI Studio, then OpenRouter)
Your Stage 1 tool only talks to your local LM Studio. That’s half the story. The other half is making the same tool also work against cloud model providers — for three reasons:
- Reach — most colleagues won’t bother to install LM Studio. They will use your tool if it works against a cloud backend they can sign up for in 60 seconds.
- Model choice — your laptop runs a tiny model. Cloud providers offer Gemini, Llama 70B, Claude, GPT-5.5, and dozens more. Switching takes a few strings, not a code rewrite.
- Standards pay off — LM Studio, Google AI Studio, and OpenRouter all speak the same OpenAI-compatible API. The same HTML you just shipped can talk to any of them, with one change: the URL.
Hosted vs local — what actually changes
| Field | LM Studio (local, Stage 1) | Google AI Studio (cloud) | OpenRouter (cloud marketplace) |
|---|---|---|---|
| Base URL | http://localhost:1234/v1/chat/completions |
https://generativelanguage.googleapis.com/v1beta/openai/chat/completions |
https://openrouter.ai/api/v1/chat/completions |
| Auth header | none (CORS only) | Authorization: Bearer <API key> |
Authorization: Bearer <API key> |
| Model name | qwen3.5-0.8b (whatever you loaded) |
e.g. gemini-2.5-flash (free tier) |
e.g. meta-llama/llama-3.3-70b-instruct:free |
| Where the bytes go | nowhere — they stay on your laptop | Google’s servers | OpenRouter’s proxy → the model host |
| Cost | free, your electricity | free tier exists; paid tiers for higher limits | most flagship models cost; many :free models are free with rate limits |
Three small additions to the HTML tool cover all of this:
- An API URL input — so the user can switch backends.
- An API key input — empty for LM Studio; required for cloud providers.
- A new convention in the fetch loop: include the
Authorization: Bearer …header only when a key is present.
The rest of the code does not change. That is the whole point.
ImportantThe one rule that matters today — never hardcode an API key
Never hardcode an API key in source code. Not in HTML, not in Python, not in a notebook, not in any config that gets committed to git.
The reason isn’t paranoia — it’s that source code travels. You push it to GitHub. You share the file with a colleague. You paste a snippet into Slack. Codex commits something on your behalf. Every one of those is a path your key can take to a stranger. A leaked key on a paid API can run up real charges in hours.
For an HTML file that runs in a browser, the practical choices are:
- A form field that starts empty — the user pastes their own key per session. The key lives only in browser memory. (This is what we use today.)
localStorage— the browser remembers the key after one paste. Convenient, but the key now lives on the visitor’s machine. Per-origin only.- An external config file, listed in
.gitignore. Mirrors the “real” pattern but adds plumbing.
For other languages, the mechanism changes but the rule does not:
- Python script: read from a
.envfile (python-dotenv) oros.environ["GOOGLE_API_KEY"]. - Any git repo: add
.env,*.key,secrets.json, etc. to.gitignorebefore you ever write a key into them. - Codex itself: when Codex needs a key, it should read it from your environment, not from chat history.
Pick the right mechanism for the language. The rule never changes.
Step 1 — Get a Google AI Studio API key (live)
Open https://aistudio.google.com/apikey in your browser. Sign in with any Google account (Harvard Workspace or personal — both work). Click Create API key → pick or create a project → copy the key that appears.
The key starts with AIza… and is roughly 40 characters. Hold onto it for the next step. Do not paste it anywhere except the tool’s API Key field — not into the source file, not into chat, not into Slack.
Google AI Studio has a free tier that covers everything we do today. gemini-2.5-flash calls cost nothing on the free tier (with rate limits well above what a workshop session needs).
Step 2 — Workshop OpenRouter key
I will hand each of you a workshop OpenRouter API key during this section. It is a shared key with a hard daily limit, intended for the in-class demo only. Treat it as semi-public — it will be revoked at the end of the workshop and replaced by your own key (instructions at the end of Part E).
ImportantThe 50-request-per-day ceiling on free OpenRouter models
Free OpenRouter models are rate-limited to 50 requests/day per key on the no-credit tier (and 20 requests/minute regardless of tier). One shared workshop key across the whole class can blow through 50 fast. If the tool starts returning 429 errors, switch the API URL back to LM Studio or Google AI Studio — same tool, just change the field. Or register your own free OpenRouter key right now (instructions at the end of Part E) and you have your own 50/day budget.
Step 3 — Revise the tool — one Codex turn
We want two new form fields in the same index.html:
- An API URL input — defaults to LM Studio’s local URL, but can be changed to any OpenAI-compatible endpoint.
- An API Key input — defaults to empty (LM Studio doesn’t need one); for cloud providers, you paste the key here.
This is a clear, single-scope extension, not piecemeal building. Send Codex one description:
Modify index.html to add two new form fields above the model name field:

1. An "API URL" text input, default value http://localhost:1234/v1/chat/completions.
2. An "API Key" password-type input, default empty. (Use type="password" so the key is masked while typing.)

Update the fetch call:
- POST to whatever URL is in the API URL field (not the hardcoded localhost).
- If the API Key field is non-empty, add an "Authorization: Bearer <key>" header. If empty, omit the header entirely (LM Studio doesn't want one).

The tool should work for any OpenAI-compatible endpoint with these three fields filled in. Update the model field's placeholder text to show three common examples:
  - qwen3.5-0.8b (LM Studio)
  - gemini-2.5-flash (Google AI Studio)
  - meta-llama/llama-3.3-70b-instruct:free (OpenRouter)

Keep everything else exactly the same.
Approve the edit. The file gets ~10 lines longer. Open it again in your browser (refresh the tab).
Step 4 — Test it still works with LM Studio
Same workflow as Stage 1:
- API URL: leave at
http://localhost:1234/v1/chat/completions(the default) - API Key: leave empty
- Model:
qwen3.5-0.8b - System prompt: the NER one from Part C
- File:
sample-sentences.txt - Press Run
You should see exactly what you saw at the end of Stage 1. Nothing has regressed.
Step 5 — Test against Google AI Studio
Three changes to the form:
- API URL:
https://generativelanguage.googleapis.com/v1beta/openai/chat/completions - API Key: paste your Google AI Studio
AIza…key - Model:
gemini-2.5-flash
Same system prompt, same file. Press Run.
You should see the same progress counter, the same results area, the same CSV download — except the work is now happening on Google’s servers, and the model is Gemini, not Qwen. Compare the outputs side by side.
If you get an error, the failure mode is itself the lesson. Open the browser console (right-click → Inspect → Console). Read the error. Send it to Codex:
The tool failed when I pointed it at Google AI Studio. Here is the console error: <paste>

Here is the request the tool sent (Network tab → the failing request → "Copy as fetch"): <paste>

What is the most likely cause? Suggest one minimal fix and explain why.
This is the agentic-debugging loop. You don’t need to know the answer; you need to know how to route the answer through Codex.
TipMost common Google AI Studio gotcha
The base URL must include /v1beta/openai/chat/completions. Some students will paste only the host (https://generativelanguage.googleapis.com) and get a 404; others will paste the host plus /openai/ without the chat/completions suffix. Our HTML tool does a raw fetch() to the full URL, so paste the whole path including /chat/completions.
Step 6 — Test it now works with OpenRouter — same tool, no rebuild
Three more changes to the form:
- API URL:
https://openrouter.ai/api/v1/chat/completions - API Key: paste the workshop OpenRouter key (or your own)
- Model:
meta-llama/llama-3.3-70b-instruct:free
Same system prompt, same file. Press Run.
It works. Same HTML, same code, third provider. That is the OpenAI-compatible standard paying off in real time.
NoteOne code change, two new providers
You wrote one tool. You revised it once (in Step 3) to take an API URL and a key. Without any further code change, that tool now talks to three completely different backends — your local LM Studio, Google’s cloud, and OpenRouter’s proxy. This is one of the most important practical lessons of the workshop: when a community standardizes on an API shape, your code stops being tied to one provider. Pick standards-compliant tools.
Step 7 — Compatibility is rarely the whole story
Now the wrinkle. Not every cloud provider speaks OpenAI’s shape fully. Anthropic’s Claude, for instance, has its own native API at /v1/messages with a different auth header (x-api-key), a different message structure, and different response fields.
Anthropic does publish an OpenAI-compatibility layer — point an OpenAI SDK at https://api.anthropic.com/v1/, swap key and model name, and basic chat completions work. So in principle your tool could call Claude too.
But Anthropic is explicit that the compat layer is for testing and evaluation, not production. The things it silently drops or ignores include:
- Prompt caching — the cost-saving feature that makes long-context Claude usage affordable.
- Structured outputs — guaranteed JSON-schema conformance.
- Audio / PDF / file input — stripped from the request.
response_format,stricton tools,logprobs— ignored.- Several system-message behaviours — concatenated and hoisted, not preserved as authored.
To use those features you need the native Messages API, a different request shape your current HTML tool does not produce.
ImportantThe general lesson — compatibility is rarely complete
Compatibility layers exist for almost every “non-OpenAI” provider — Google’s, Anthropic’s, Mistral’s, Cohere’s. They are real and they often work for simple cases. But every layer is a translation, and translations drop nuance. When you adopt a new provider for serious work, do not assume their OpenAI-compatible endpoint exposes everything. Read the limitations list. Compare it to what you actually need. Then decide whether the convenience is worth what you lose.
This is true across software in general: a compatible API is rarely the full API. The same will be true the next time you meet “X-compatible mode” in a different domain.
Privacy contrast
With LM Studio, your sentences never leave your laptop. With any cloud API (Google, OpenRouter, OpenAI direct, Anthropic), your sentences go to the provider’s servers and stay there long enough to be processed — sometimes longer, depending on the provider’s data-retention policy. For a published novel, a public manuscript, or a CC-licensed corpus, either is fine. For a private archive, an interview transcript, unpublished research data — local only. The API URL field is also a privacy switch. Be deliberate about which you flip.
The economics matter too. A workshop-scale workflow on Google AI Studio or OpenRouter free tiers is free. A real research workflow against thousands of documents is not free on any hosted provider. Local models are the answer to scale, sensitive material, and reproducibility — the same Qwen weights run the same way today and in five years; a hosted endpoint version-bumps under you.
Hosted = capability + risk. Local = control + responsibility. The right tool is the question, not the default.
Critical — before you commit, clear the API key
WarningDo not commit your API key to GitHub
The API Key field in your form is just text. If you save the file with a key typed in, that key is in index.html. If you then git commit and git push, your key is on the public internet within seconds, and credential-harvesting bots will scrape it within minutes.
Before staging the file, refresh the page so the field empties, OR clear the field by hand. The file on disk should have an empty default value for the API Key input.
OpenRouter’s free tier doesn’t expose much risk — worst case the key gets rate-limited and you make a new one. A paid key tied to a credit card is a different story. The same goes for Google AI Studio keys on a billing-enabled project.
Commit and push — second deploy
cd ~/genai-workshop/batch-llm-caller
git status                # confirm only index.html changed
git diff                  # quick scan: no API key in the diff
git add -A
git commit -m "Stage 2: add cloud-API support (API URL + API key fields)"
git push
Within ~60 seconds, GitHub Pages rebuilds and the deployed URL serves the new version. Refresh https://YOUR-USERNAME.github.io/batch-llm-caller/ in your browser. You now see the API URL and API Key fields. Test against Google AI Studio from the deployed page — it works (HTTPS-to-HTTPS, no mixed-content issue). Test against OpenRouter — also works. Three providers, one deployed URL.
TipStage 2 complete
You have just walked the edit → commit → push → deploy loop a second time. The tool grew one feature — generic API URL + key — and that single feature unlocked talking to two new providers at runtime. That is what shipping incrementally looks like, and that is what the OpenAI-compatible standard buys you.
Ask Codex to drive Git for you
You have now typed git init, git add -A, git commit -m "...", and git push a couple of times. Worth doing once or twice so you know what the commands look like. For everyday use, you do not have to memorize them. Codex Desktop’s terminal pane gives you a shell; the chat gives you an agent. Type the intent into the chat, watch the agent propose the commands, approve.
The most useful pattern:
Look at what I've changed since the last commit and commit it with a short, accurate message that describes the change. Then push to origin.Codex inspects git status and git diff, writes a sensible commit message (often a better one than you would have written in a rush), proposes git add, git commit, git push, and waits for your approval at each step. The Default permissions mode guarantees you see every command before it runs — and once you have added an AGENTS.md (see the appendix), any rules you put there will further shape what Codex proposes.
A longer menu of Git-via-natural-language patterns (history exploration, safe undo, revert) is in the appendix at the bottom of this session. For Stage 3 below, “commit and push” is enough.
TipThe agentic shift, restated
The point of an AI coding agent is not that you stop knowing how Git works. The point is that the agent knows how Git works, and you describe what you want to happen at the level of intent. You stay responsible for what; the agent handles how. Watch the commands it proposes — that is how you keep “agentic” from sliding into “blind.”
Part E — Stage 3: add image OCR support
Your Stage 2 tool processes text files. The same OpenAI-compatible API supports images too — pick a vision-capable model, send an image (base64-encoded) instead of plain text, get back transcribed text. That is the third feature. The HTML mostly stays the same; the file picker now also accepts images, and the request body changes shape when the input is an image.
What we are adding
- The file picker accepts
.jpg,.jpeg,.pngin addition to.txtand.csv. - When the user picks an image, the tool reads it as base64 and sends an OpenAI-vision-style message: a
usermessage whosecontentis an array of{type: "text"}+{type: "image_url"}parts. - When the user picks a text/CSV file, the existing batch behaviour is unchanged.
- The download CSV has the same columns; the
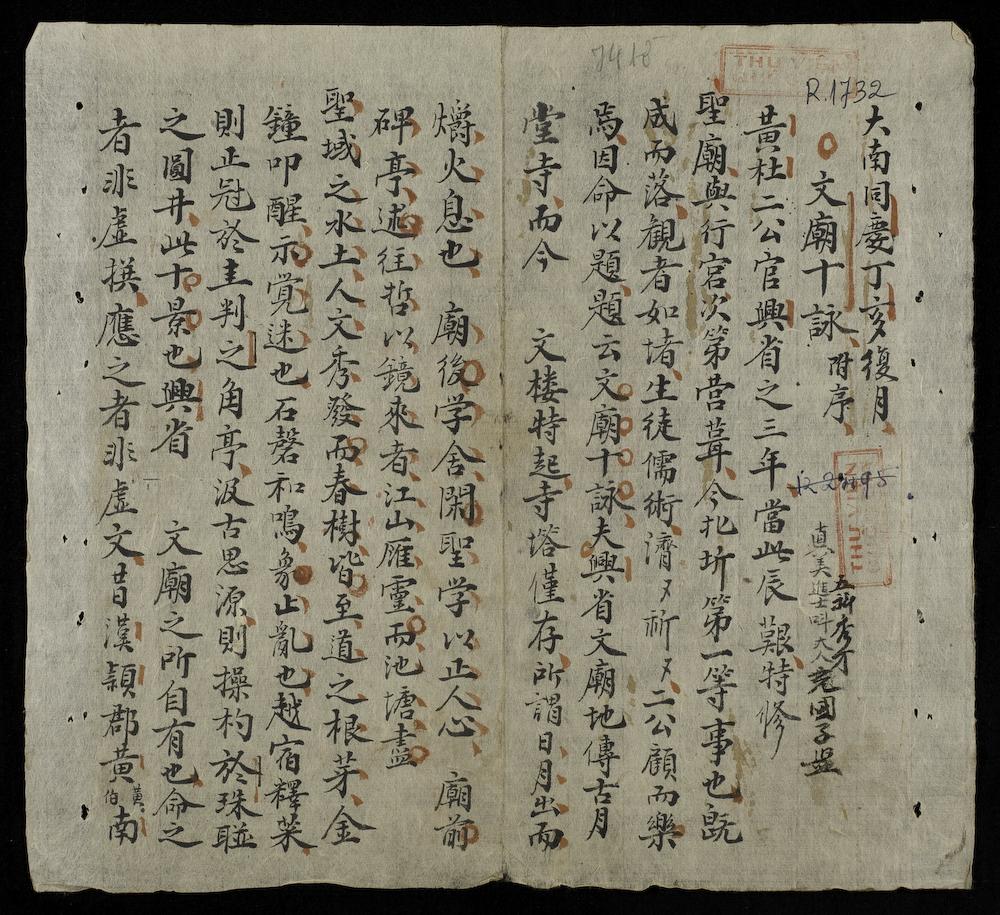
inputcolumn for an image stores the filename, and theresponsecolumn stores the transcription.
The hands-on goal: OCR a page from a Vietnamese manuscript in classical Han script. The file materials/nlvnpf-0100-001.jpg is a digitization from the Nôm Foundation / National Library of Vietnam. Hand-brushed columns, marginal stamps, vertical reading order. Real humanities-research material.
Revise the tool — one Codex turn
Extend index.html to also support image inputs alongside text/CSV inputs:

1. Update the file picker to accept .jpg, .jpeg, .png in addition to .txt and .csv.
2. When the picked file is an image:
   - Read it via FileReader as a base64 data URL.
   - Build a single request whose user message has content as an array:
     [
       {"type": "text", "text": <use the system prompt textarea content as the user-text part if it isn't empty; else use "Transcribe this image as accurately as you can.">},
       {"type": "image_url", "image_url": {"url": "<the base64 data URL>"}}
     ]
   - Send one POST (not a loop) to the configured API URL with the configured API key.
   - Display the response in the results area as a single row: input column = filename, response column = the model's text.
3. When the picked file is .txt or .csv, keep the existing batch behaviour exactly as it is.
4. Update the "Download CSV" output so a single-row image result also downloads cleanly.
5. Update the model field's placeholder to suggest a vision-capable model when the picked file is an image: qwen2.5-vl-7b for LM Studio (if loaded), qwen/qwen2.5-vl-72b-instruct:free for OpenRouter.

Do not change the existing form fields, the system prompt textarea, the API URL field, or the API Key field. The page should look the same; the file picker just accepts more types.
Approve. Read what Codex changed — it should be ~20–30 lines added.
Test against LM Studio (small vision model)
Qwen3.5 0.8B is multimodal by design — the family was trained with a unified text-and-vision backbone. But the specific build of Qwen 0.8B you downloaded in LM Studio may or may not support image input — many of the smaller GGUF / MLX variants ship as text-only. So this step has two possible outcomes; both teach something useful.
WarningWant to see the local vision test actually work?
Load a dedicated vision-language model in LM Studio first — for example Qwen2.5-VL-7B (search “Qwen2.5-VL” in LM Studio’s model browser). The 7B VL variant is purpose-built for image input and reliably handles base64 image messages. After it loads, point the Model field at it (qwen2.5-vl-7b or whatever LM Studio names it).
If you stay on the loaded Qwen 0.8B, the request may error out with something like “this model does not support image input” — that’s expected on a text-only build. Read the error, then move on to the OpenRouter step below.
Try it anyway:
- API URL: LM Studio (default)
- API Key: empty
- Model: whatever vision-capable model you have loaded (e.g.,
qwen2.5-vl-7b) — or leave asqwen3.5-0.8bto see what happens - System prompt: leave blank, or paste the prompt below
- File:
materials/nlvnpf-0100-001.jpg - Press Run
System prompt to paste (optional):
You are a careful transcriber of classical Chinese manuscript pages. Preserve column order and vertical reading direction. Mark unclear characters with [?].What you’ll see depends on what you loaded:
- Vision-capable local model (Qwen2.5-VL-7B or similar): a partial transcription. Not great — 7B is still small for classical Chinese — but recognizable text. The point: the same HTML you wrote works against an image-aware backend.
- Text-only local build: the request errors. Read the error in the browser console. The point: not every “small local model” is the right tool for every task; the next step shows that swapping in a stronger, cloud-hosted model takes two strings, not a code rewrite.
Switch to a real vision model on OpenRouter
Three changes to the form:
- API URL:
https://openrouter.ai/api/v1/chat/completions - API Key: workshop key (still in your hand from Stage 2)
- Model:
qwen/qwen2.5-vl-72b-instruct:free
(qwen2.5-vl-72b-instruct:free is Alibaba’s 72-billion-parameter Qwen2.5-VL — a vision-language model trained heavily on Chinese text. It is the strongest free option on OpenRouter for classical-Chinese manuscript OCR.)
Same file. Press Run.
This time you should see an actual transcription. Not perfect — classical Chinese OCR is genuinely hard — but recognizable column-by-column text, with some characters correctly identified, some marked unclear. Compare to what the 0.8B produced.
NoteWhat changed and what didn’t
The HTML did not change between these two tests. The Codex prompt did not change. Your code didn’t change. You changed two strings in form fields (API URL and Model), and the same tool now does something the small local model could not. This is what the OpenAI-compatible API standard buys you: model choice as a runtime parameter, not a build-time commitment.
Critical — clear the API key (again)
Same callout as Stage 2: clear the API Key field before staging. This time you have three commits in your history; one slip publishes a key.
Commit and push — third deploy
Either type the commands:
git add -A
git commit -m "Stage 3: add image OCR support (vision API message format)"
git push
…or ask Codex:
Commit my latest changes with a short, accurate message and push.Within ~60 seconds, refresh the deployed URL. The deployed page now has image support. Re-run the OCR test from the deployed URL against the workshop OpenRouter key — same result you got locally, just served from https://YOUR-USERNAME.github.io/batch-llm-caller/.
TipStage 3 complete
You have walked the edit → commit → push → deploy loop three times in one session. You started with a single-backend text tool, grew it to support a second backend, then grew it again to handle a different data type. The deployed URL evolved with you, automatically, with no extra infrastructure to manage. This is real iterative software delivery, sized for a humanities researcher.
Get your own OpenRouter key
The workshop key will be revoked at the end of the week. Before that, register your own free key:
- Sign in to https://openrouter.ai.
- Click your profile → Keys → Create key.
- Name it (“workshop personal key” or similar).
- Copy it once — OpenRouter only shows it to you that one time.
- Paste it into your deployed tool’s API Key field next time you use it.
Your own key gets its own 50/day budget against the free models — independent of the workshop key. (Buy $10 in credits and the daily ceiling becomes 1,000; for ordinary research use, 50/day is usually enough.) You can keep using your tool indefinitely.
Codex-Git toolkit — patterns for when you need them
You used one natural-language Git pattern in this session (“commit and push”). Here are three more, in the order you are likely to need them. Keep this section for reference; you do not need to memorize anything here.
Look at recent history
Show me the last five commits on this branch with a one-line summary of what each one changed.The agent runs git log --oneline -5 and follows up with git show <hash> for the ones worth opening — far more readable than remembering the right git log flags.
For a richer view:
Show me commits from the last 24 hours with their timestamps and what files they touched.The agent uses git log --since="24 hours ago" --stat.
Undo the last commit, keep the changes
You committed but realize the message was wrong, or you want to add one more file before pushing.
I want to undo my last commit, but keep the file changes in my working directory so I can fix them and re-commit.The agent proposes git reset --soft HEAD~1 (moves HEAD back, keeps the file changes). Read the proposed command before approving — reset can be destructive if you ask for --hard.
Revert a range — safe undo of already-pushed work
I think I broke something in the last day. Show me the commits from the last 24 hours, then walk me through reverting back to the version I had yesterday at noon — but do it in a way that doesn't lose history, in case I want to recover any of the changes I'm undoing.The agent will typically:
- Run
git log --since="24 hours ago" --format='%h %ci %s'so you can see each commit’s time and message. - Ask you to confirm which commit you want to be back at.
- Propose
git revert <commit-range>— which creates new commits that undo each chosen commit one by one — instead ofgit reset --hard, which throws history away. - Push the result.
This is the safe shape: history is preserved, the bad commits are still in the log but their effects are reversed, and git push works without --force.
WarningWhen the agent proposes a destructive command
If a Codex turn ever proposes git reset --hard, git push --force, git branch -D, or git clean -fd, stop and think. These operations delete history or delete uncommitted files. They are sometimes the right answer — you really do want to throw away local mistakes — but they are never the right default. Ask Codex for a non-destructive alternative first (“can you do this with git revert instead?”). The Default permissions mode will pause for your approval on every one of these, which is exactly the protection it was designed for.
Encode habits in AGENTS.md
You can shape Codex’s Git behaviour by putting rules in your project’s AGENTS.md — for example “commit messages must be in the imperative mood (Add X / Fix Y / Update Z)” or “never propose git push --force; always offer git revert as the first option for undoing pushed work.” Once the rule is in AGENTS.md, every future Codex turn inherits the style.
Try it now: add an AGENTS.md to your batch-llm-caller/ folder with one rule, commit it, and the next time you ask Codex to “commit and push,” watch the agent honour the rule without you re-saying it.
Loop summary — walked three times today
flowchart LR
    A["Edit a file locally"] --> B["git add + git commit"]
    B --> C["git push"]
    C --> D["GitHub receives commit"]
    D --> E["GitHub Pages rebuilds"]
    E --> F["Tool live at\nusername.github.io/batch-llm-caller/"]
    F -->|"every push"| A
This edit → commit → push → live loop is the same one that publishes Quarto books, Hugo blogs, documentation sites, and academic project pages. You walked it three times today — once to ship the LM-Studio-only tool, once to add cloud-API support (Google AI Studio and OpenRouter), once to add OCR. By the end of the week you will have walked it dozens of times.
Summary — what you should take away
- Codex writes the tool; the tool talks to the model. Codex (agent, brain = OpenAI GPT-5.5 in the cloud) writes the HTML tool. The HTML tool talks to LM Studio (local), Google AI Studio (cloud), OpenRouter (cloud), or any other OpenAI-compatible backend. Codex itself never calls those backends directly.
- The OpenAI-compatible API is a standard, not a brand. LM Studio, Google AI Studio, OpenRouter, and dozens of other providers all speak it. One tool, many backends — change the URL, the key, and the model name. The fetch loop doesn’t move.
- Compatibility is rarely complete. Every “X-compatible” layer drops features (prompt caching, structured output, vision on some providers, etc.). For serious work, read the limitations list before betting on a compat layer.
- Never hardcode an API key. Browser HTML → form field (empty by default). Python →
.envor environment variable. The mechanism changes with the language; the rule never does. -d @file.jsonis the portable curl pattern. It works on every shell on every OS, including Windowscmdand PowerShell. The inline-JSON form is a Mac/Linux convention; avoid it in teaching materials.- Localhost is a secure origin. Browsers gate fetches with CORS (off by default in LM Studio; turn on when a browser is calling) and mixed content (HTTPS pages normally cannot load HTTP). Mixed content has a documented exception for
localhost,127.0.0.1, and[::1]— which is why your deployed HTTPS page can talk to a visitor’s local LM Studio. - Git’s four phases: working directory → staging → local repo → remote repo. Each commit is a snapshot; the history is a tree; the email on every commit is permanent. Always check
git config user.emailends in@users.noreply.github.combefore the first commit on a new machine. - Ship incrementally. Three stages, three commits, three deploys. The tool grew one feature at a time, the URL stayed the same, the deploy was automatic. Hosted = capability + risk. Local = control + responsibility. The right tool is the question, not the default.
Coming up in session 6
Session 06 steps away from tools and asks a more fundamental question: how does the model itself know anything, and when it doesn’t know something, what do we do? We will look at the two dominant strategies — Retrieval-Augmented Generation (RAG) and the LLM Wiki — and use Google’s NotebookLM as a hands-on RAG demo over a small corpus of Chinese digital-humanities papers. By the end of session 06, you will have written your first wiki page with Codex.
References
- MDN — HTML basics
- MDN — Fetch API
- MDN — FileReader API
- MDN — CORS — the canonical explanation
- MDN — Mixed content
- W3C Secure Contexts spec — the source of the localhost exception
- Chrome — Local Network Access
- Google AI Studio — API keys
- Google AI Studio — OpenAI-compatible endpoint docs
- OpenRouter — Quickstart
- OpenRouter — Free models
- Anthropic — OpenAI SDK compatibility — the limitations list referenced in Part D Step 7
- OpenAI Vision API — image input format — the message-shape spec all three providers mirror
- Git — Install for macOS
- Git for Windows — official download
- GitHub Pages quickstart
- GitHub — Setting your commit email address
- Pro Git book (free)