flowchart LR
    v1["File Version 1"] --> v2["File Version 2"] --> v3["File Version 3"]
Meeting 03
Today’s Schedule
- A little bit about version control
- Return to the terminal
- Let’s try Openwork
- In-class exercise (Terminal + Codespaces + Pull Request)
Return to the terminal
What is the terminal?
Important
A terminal is a text-based interface for your computer.
Think of it as a conversation window. Instead of clicking icons (which is like pointing at things on a menu), you type commands (like speaking to a waiter) to tell the computer exactly what to do.
A little bit about version control
Package Managers
Homebrew and Winget are package managers designed to simplify the installation, update, and management of software on macOS and Windows systems, respectively. They streamline the process of handling software packages, making it more efficient for users to maintain their systems.
Homebrew (macOS)
Homebrew is a package manager for macOS (and Linux) that allows users to install and manage free and open-source software via the command line. It’s particularly favored by developers for its simplicity and the vast array of packages available.
Installation on macOS:
- Open Terminal: You can find Terminal in the Utilities folder within your Applications, or by searching for it using Spotlight (press Command + Space and type “Terminal”).
- Install Xcode Command Line Tools: Before installing Homebrew, ensure that you have the necessary command line tools. Execute the following command:
xcode-select --install- Install Homebrew: Once you have Xcode Command Line Tools installed, run the following command to install Homebrew:
/bin/bash -c "$(curl -fsSL https://raw.githubusercontent.com/Homebrew/install/HEAD/install.sh)"This script will download and install Homebrew on your system. Follow the on-screen instructions during the installation process.
- Verify Installation: After installation, confirm that Homebrew is correctly installed by running:
brew --versionThis command should display the version number of Homebrew.
Basic Homebrew Commands
- Install a Package: To install a package, use the
brew installcommand followed by the package name.
brew install <package_name>- Update Homebrew: To update Homebrew itself, use the
brew updatecommand.
brew update- List Installed Packages: To list all installed packages, use the
brew listcommand.
brew list- Uninstall a Package: To uninstall a package, use the
brew uninstallcommand followed by the package name.
brew uninstall <package_name>- Upgrade a Package: To upgrade a package, use the
brew upgradecommand followed by the package name.
brew upgrade <package_name> Winget (Windows)
Winget, or the Windows Package Manager, is a command-line tool for Windows 10 and Windows 11 that enables users to discover, install, upgrade, remove, and configure applications. It serves as a convenient method to manage software installations on Windows systems.
Installation on Windows:
Winget comes pre-installed on Windows 11 and modern versions of Windows 10 as part of the App Installer. To verify if Winget is installed, open the Command Prompt or PowerShell and type:
winget --version If Winget is installed, this command will display the version number. If it’s not installed, you can download the App Installer from the Microsoft Store.
Using Winget
Open PowerShell: Open the Windows PowerShell console by right-clicking on the Start button and selecting “PowerShell”.
Search for a Package: To search for a specific application:
winget search <package_name>- Install a Package: To install a package, use the
winget installcommand followed by the package name.
winget install <package_name>- Uninstall a Package: To uninstall a package, use the
winget uninstallcommand followed by the package name.
winget uninstall <package_name>- Upgrade a Package: To upgrade a package, use the
winget upgradecommand followed by the package name.
winget upgrade <package_name> Shortcut
- Open Antigravity.
- In the extension settings, search for “Topcoder Fullstack” and install it.
What is Version Control?
- Version control is a system for tracking changes to files over time.
- It lets you save snapshots of your work, revert to earlier versions, and track who made which changes.
- Think of it like the track changes feature in Word or Google Docs, but more powerful and for all kinds of files.
- Why it matters: No more files named “Essay_final_v5_FINAL.docx” – version control keeps a history so you always have every version.
What is Git?
- Git is the most widely used version control tool (VCS) in the world.
- It runs on your computer to track changes in a project (a local repository).
- Git lets you record commits (snapshots of your files) and then sync with a remote server (e.g., GitHub) to share those changes.
- You can experiment on separate branches without affecting the main project, then merge your work when it’s ready.
flowchart LR
    WD[Working Directory] -->|git add| Index[Staging Area] -->|git commit| Repo[Local Repository]
    Repo -->|git push| Remote[GitHub Repository]
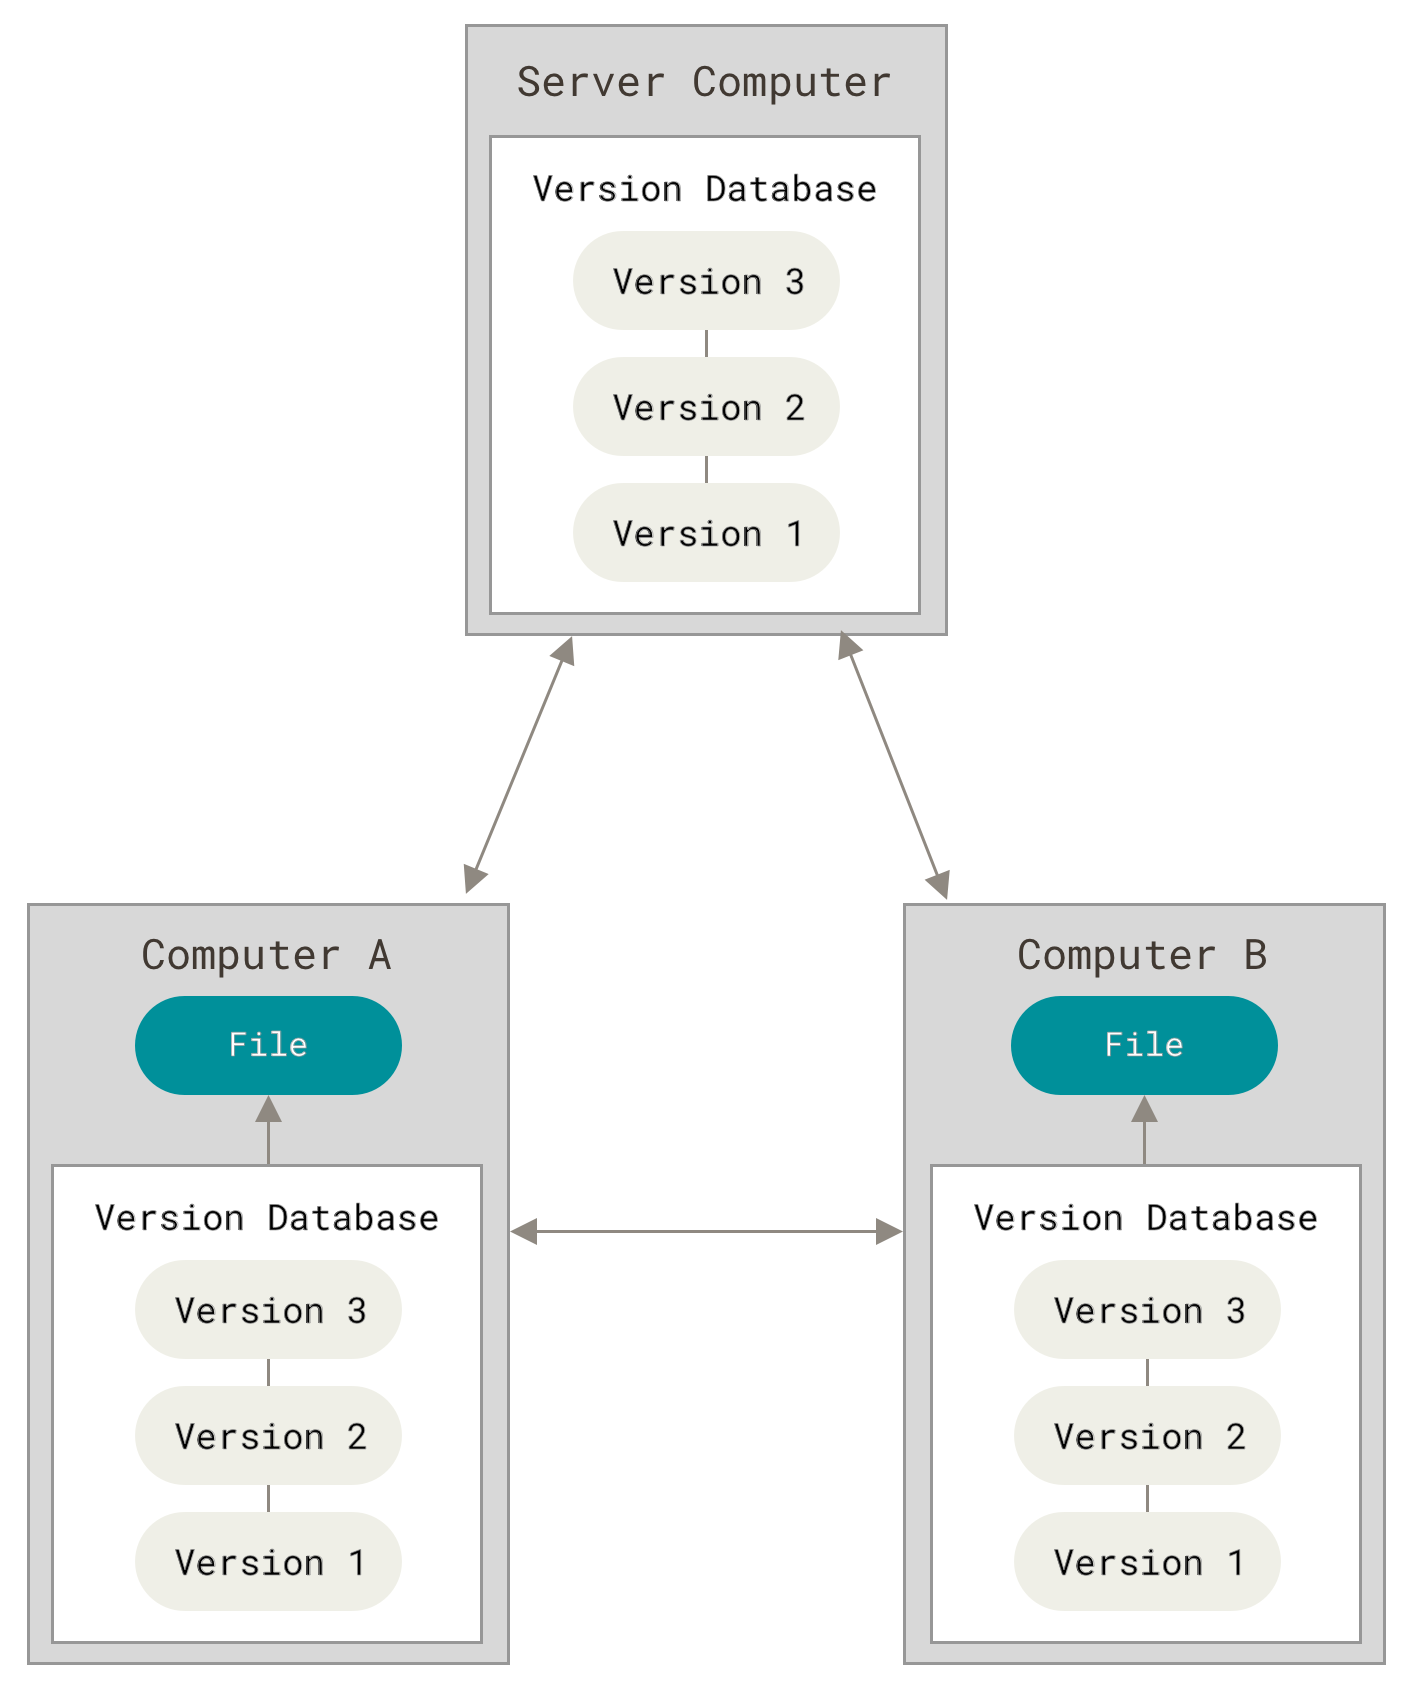 (Image source: Git)
In most of the cases, the “Server Computer” is the code repositories. In our case, it is GitHub.
Install Git and GitHub
Homebrew
- Open Terminal
- Run the following command to install Homebrew:
brew install git- Try the following command to check if Git is installed:
git --version- Run the following command to install GitHub CLI:
brew install gh- Try the following command to check if GitHub CLI is installed:
gh --versionWinget
- Open PowerShell
- Run the following command to install Git:
winget install --id Git.Git- Try the following command to check if Git is installed:
git --version- Run the following command to install GitHub CLI:
winget install --id GitHub.cli- Try the following command to check if GitHub CLI is installed:
gh --versionHow to Register a GitHub Account?
- Go to GitHub.com and click Sign Up.
- Choose a username (this will be your handle on GitHub).
- Enter your email (use your Harvard email or EDU email if you want to use the Education benefits) and create a password.
- Verify your account via the email sent by GitHub. -Choose the free plan (it’s sufficient for almost all academic projects).
- Tip: You can skip creating a repository during sign-up – we’ll do that ourselves.
What is Quarto?
Quarto is an open-source scientific and technical publishing system. It:
- Uses a .qmd (Quarto Markdown) file to combine text, code, and outputs.
- Can render to multiple formats (HTML, PDF, Word, reveal.js slides, etc.).
- Supports Python, R, Julia, and more.
- Ideal for reproducible documents, such as articles, presentations, or data analyses.
Install the Quarto CLI
Using the official installer:
- Download Installer: Visit the Quarto Downloads page and download the installer for your OS.
- Run Installer.
- Verify Installation: Open Terminal and run:
quarto --versionInstall the Quarto extension for Antigravity
- Open Antigravity.
- Click the “Extensions” button on the left sidebar.
- Search for “Quarto” and click “Install”.
Structure of a .qmd File
A .qmd (Quarto Markdown) file typically has: 1. YAML Header (between — lines):
---
title: "Document Title"
author: "Your Name"
format: html
---- Body Content in Markdown:
# Introduction

This is normal text written in Markdown.
When you run:
quarto render your_file.qmdQuarto processes the .qmd file and produces the output format(s) you specified (e.g., .html, .pdf, etc.).
Practice: Creating a Quarto Document and Pushing to GitHub
This guide will walk you through the process of creating a folder, initializing a Git repository, creating a Quarto (.qmd) file, making initial commits, revising the file, and pushing the changes to a remote repository on GitHub.
Prerequisites:
- Git: Ensure Git is installed on your system. Verify by running
git --versionin your terminal. - Quarto: Ensure Quarto is installed. Verify by running
quarto --versionin your terminal. - GitHub Account: Ensure you have an account on GitHub.
Instructions:
- Create a Folder:
Open your terminal or command prompt.
Navigate to your desired parent directory using the
cdcommand.Create a new folder named
my_project:mkdir my_projectNavigate into the newly created folder:
cd my_project
- Initialize a Git Repository:
Initialize an empty Git repository in the current directory:
git initThis command creates a
.gitsubdirectory, setting up the necessary files and structures for version control.
- Create a Quarto (
.qmd) File:Open your preferred text editor (e.g., Visual Studio Code).
Create a new file named
document.qmdwith the following content:--- title: "My First Quarto Document" author: "Your Name" date: "2025-02-11" format: html --- # Introduction This is my first Quarto document.Save the file in the
my_projectdirectory.
- Make the First Commit:
In the terminal, ensure you’re in the
my_projectdirectory.Stage the new file for commit:
git add document.qmdCommit the staged file with a descriptive message:
git commit -m "Add initial Quarto document"
- Revise the
.qmdFile:Open
document.qmdin your text editor.Add a new section:
# Conclusion

This concludes my first Quarto document.
Save the changes.
- Make a Second Commit:
Stage the modified file:
git add document.qmdCommit the changes with an appropriate message:
git commit -m "Add conclusion section to Quarto document"
- Push to a Remote Repository on GitHub:
- Create a Remote Repository:
- Log in to your GitHub account.
- Click the “+” icon in the top-right corner and select “New repository”.
- Name the repository
my_projectand choose its visibility (public or private). - Click “Create repository”.
- Connect Local Repository to GitHub:
In the terminal, add the remote repository:
git remote add origin https://github.com/your-username/my_project.gitReplace
your-usernamewith your GitHub username.
- Push Local Changes to GitHub:
Push your commits to the remote repository:
git push -u origin mainIf your local branch is named
master, replacemainwithmaster.
- Create a Remote Repository:
Notes:
- The
git addcommand stages changes, preparing them for a commit. - The
git commitcommand records the staged changes in the repository’s history. - The
git pushcommand uploads local repository content to a remote repository.
By following these steps, you’ve successfully created a project, tracked its versions using Git, and published it to GitHub.
In-class exercise (Terminal + Codespaces + Pull Request)
Please complete the in-class exercise here:
Let’s try Openwork
In order to start using agentic approach for your research as soon as possible, we will use Openwork, an easy-to-use version of OpenCode. We will use Openwork to build a research workflow agent.
- Download Openwork from Openwork.
- The “Big Pickle” model in Openwork is free for limited time use. It is the GLM-4.6 model from Z.ai.